Students/michaelberger/250B/
Contents
MUSIC 250B, Winter 2009, Research Page
This research page has been completed as part of the following assignment:
    Wiki "Community Service" Project

    As an end-of-term deliverable for 250b, prepare a helpful and factual Wiki page on the
    ccrma wiki on a topic relevant to the course. The goal of the wiki page is to create a
    repository for the facts, links and processes which sustained your work in 250b this term.
    The target audience for this page is the collection of future CCRMA students interested
    in HCI and music taking the 250 series of courses. Hopefully, your work will not only
    inspire their future work but will also act as a valuable resource from which they can get
    a head-start on similar projects, in a sense, "standing on the shoulders of giants"
    (yes, this means you are all "giants").
GRIP MAESTRO
Abstract
- The "GRIP MAESTRO" developed out of my desire to create an instrument for electroacoustic performance that not only maps well and is interesting to play and to hear, but also demands and promotes a great deal of performative energy from the performer. By doing this it is my hope to have a very strong connection not only between the performer and his instrument (through the need for physical effort in performance, and a corresponding physical feedback from the instrument), but also between the audience and the performer (through the visibility of this first relationship, and its audio correlates).
- The first version of the GRIP MAESTRO (designed and completed in the Spring of 2008 for Chris Chafe's Music 220C), the "Mach 1," aimed to accomplish the first half of this performative relationship system: that of the performer and the instrument. The resistance provided by the finger and palm pads of the Grip Master (more below, in the section on the 220C poster session) gives the performer a very good idea of the his/her playing position at any time, and allows him/her to "feel his/her way through the performance.
- The Mach 1 serves as a reliable proof of concept for this ideal situation, but comes bundled with several drawbacks that my current work on the instrument as sought to address.
- Firstly, the second half of my performative goals that there be a connection between the audience and the performer that is born directly out of the performers relationship with the instrument, is present in the Mach 1, but far too subtle. The limits of the interface as is, are explored and stressed in my current work for Music 250B through honed and new mapping ideas (discussed below). This consideration also plays a MAJOR role in the schematic changes that are presently in the works for the next version, the Mach 2.
- Secondly and more practically, the pad-resistance given by the hand exerciser's springs, is too high for the average user/performer. I do not condone the philosophy, rampant in the electronic musical interface world, that an instrument's performance practice should be immediately perfectible. As much as it pains me to admit, I am a fan of practice. However, since I also, do not wish to force hours of preparation onto my potential performers at this stage of the game, and since I have had several users complain about PAIN resulting from the use of the Mach 1, the Mach 2 is built upon a Grip Master with 40% less resistance (3 lbs, instead of 5).
- The GRIP MAESTRO: Mach 2 will be a two-handed instrument (2 devices, one in each hand) each instance of the Mach 2 will have not only the same 6 magnets and hall-effect sensors that made the Mach 1 famous, but also an accelerometer in the hopes (and through my previous work mapping gestures in SLOrk) that this will allow for larger and more dramatic gestures on the part of the performer, and so provide a very strong connection between the audience and the performer.
Background, the Mach 1 (from Music 220C, Spring 2008)
- Equipment & Parts (Summary -- for more details see my 220C research wiki linked above)
- 1 x GRIP MASTER hand exerciser. (5 lb resistance for each of 6 springs.)


- 1 x Arduino Diecimila with 1 x Arduino Protoshield Kit and 1 x mini-bread-board
- wires, solder, blood of one's enemies
- Construction -- (these are instructions for building the final working model of the Mach 1, there are steps that I took at the time, that were less than successful, that I will be omitting here)
- Tools -- Solder, Soldering GUN, Hot-Glue, (see schematics below)
- Steps --
- 1) Glue Magnets one at a time (with hot-glue) to the underside of each finger pad. They should be placed equally distant from each 'side' of the pad and near the upper side of the spring. Two magnets should then also be glued between the springs (centered) on the palm pad. (see diagram below)
- 1b) At this point you may or may not need to allow time for the glue to set (More on this for the construction of the Mach 2, below).
- 2) HALL EFFECT sensors should then be hot-glued one at a time, directly opposite the attached magnets, so that they are ON-AXIS (i.e. in line) with each other. (again, see diagram below)

- 3) After all of these glued pieces have set, we may now begin soldering the wiring together. I recommend keeping your wires functionally separated by colour (i.e. grey/black for grounding, red for Voltage, Green for sensor out, etc...)
- a) First we will wire up the ground for each sensor in parallel. The ground from the HALL EFFECT sensors is the middle lead on each. (see diagram below)
- 3) After all of these glued pieces have set, we may now begin soldering the wiring together. I recommend keeping your wires functionally separated by colour (i.e. grey/black for grounding, red for Voltage, Green for sensor out, etc...)

- b) Next, we will wire up the voltage also in parallel. The voltage for each sensor goes in on its leftmost lead. (see diagram below)

- the completed ground and power wiring will look something like this:

- c) Finally, we will wire up the sensor analog outputs, one wire for each sensor. (see diagram below)


- the ordering of analog outputs 5 and 6 is up to you. I believe in the end, I may have used a them in reverse order, with the higher numbers being farther away from the 'top' of the device.
- 4) I use a ribbon wire with a female connector at the device-end and a male connector at the circuit-board end.
- 5) As a final touch, a two-way LED is glued to the device-end connector and power and ground supplied through the final two holes in the connector. This not only looks mind-bogglingly amazing, but also functions as an indicator that the device is "ON" and plugged in correctly. If the connector is plugged in to the circuit-board backwards, the LED will light-up RED instead of GREEN.
~
- 6) The bread-board/circuit-board is wired up simply to pass +5V to the sensor Voltage and LED Voltage wires on the ribbon cable, to provide ground for both of these circuits' grounds (with a 330 Ohm resistor on the LED circuit, ground-side), and to pass each analog output of the six HALL EFFECT sensors to the first six analog inputs on the Arduino. The following image shows this wiring; the male ribbon wire connector would connect to the breadboard on the lower-left side of the image.


- SOFTWARE!!! (code)
- The Arduino software is simple; it listens to each analog input and then broadcasts the values through the Serial connection to the computer (over USB). The code may be read here.
- The Computer listens to the serial ports with a program in Max/MSP. The original code, by Daniel Jolliffe, may be found here. My modification of it for the GRIP MAESTRO here.
- My Max/MSP code not only listens to the serial port, it also scales all of the incoming data to give a range of values that I am happy with, and broadcasts those values via OSC to the localhost (same computer) for whatever hypothetically listening software to receive and process into sound. For the GRIP MAESTROs Mach 1 and Mach 2, I use ChucK for this purpose.
- The first mapping of the data I wrote (found here) maps the position of each of the finger pads on the GRIP MAESTRO to the frequency of a corresponding Sine Wave Oscillator, and the palm pad to volume control. This patch is meant only as a proof of concept; to show that I am indeed sending and receiving data from the device, and that that data directly corresponds to the control over the sound parameters as I have set them.
- The second mapping is an adaptation of code originally written by Kyle Spratt (MA/MST 2008) for his piece, "I Miss My Uncle Charles." The code listens to an incoming audio stream and granularizes it depending upon control parameters set up by the user through the interface of the computer keyboard. My adjustment of this code replaces the keyboard with the GRIP MAESTRO, and controls four separate paths of this original granularization (through each of the four finger pads), and controls volume with the overall depression of the palm pad, and pitch with the tilt of the palm pad. The code is available here. A performance on this mapping using Radiohead's "Nude" as the incoming audio stream, may be seen here.
- My Max/MSP code not only listens to the serial port, it also scales all of the incoming data to give a range of values that I am happy with, and broadcasts those values via OSC to the localhost (same computer) for whatever hypothetically listening software to receive and process into sound. For the GRIP MAESTROs Mach 1 and Mach 2, I use ChucK for this purpose.
I presented a Poster on this work at the 2008 CCRMA Open House, the contents of which may be read below. The section following this, will deal with the changes, and developments that have taken place this passed quarter in preparing the hardware and software for the next version of the GRIP MAESTRO, the MACH 2.
- POSTER SESSION @ CCRMA OPEN HOUSE 2008!
  Introduction
     Part of the Michael's ongoing research (supported by the Social Sciences and
  Humanities Research Council of Canada), the “GRIP MAESTRO” is the composer's
  latest attempt to incorporate real physical resistance and haptic feedback into
  an electroacoustic performance interface. The goals of this specific project
  are to take advantage of a simple physical gesture (not previously utilized by
  an existing acoustic instrument: see next section), and, by incorporating physical
  resistance, create an “easy to learn / difficult to master” interface for the
  creation of, and control over real-time electroacoustic performance in both a
  solo and ensemble setting.
     The “GRIP MAESTRO” is a modified hand exerciser called a “Grip Master”
  (see section below). By measuring the position of the pads on the device and carefully
  mapping them to parameters of music creation, Michael hopes that the “GRIP MAESTRO”
  will provide the feel, control, and aural feedback necessary to be an effective
  interface between performers and their music, and between audiences and their
  performers.
     Presently there are two mappings of the control data prepared in the ‘strongly
  timed’ programming language, “ChucK”. Michael is presently in the planning stages
  of a third, but there are a multitude of potential applications and mappings for
  which the “GRIP MAESTRO” is ideal.
~
  Movement & Resistance
     The action of gripping and squeezing by the hand(s) was chosen  early on to
  be the the central aspect of this interface.  Many existing acoustic and electro-
  acoustic instruments rely heavily on the performers hands as driving controlling
  agents, but few utilize and emphasize the motion of gripping specifically.
     In order for an interface to take full advantage of the motion of this activity,
  it needs to provide physical feedback and/or resistance to the activity consistently
  for the full range of its motion. It is very important to the composer that any given
  interface feature a real and innate physical feedback/resistance to the performer’s
  actions so that he or she may feel as closely in tune with that interface as possible
  and so that the sounds that are produced by the performative actions relate to the
  nature of the actions themselves.
~
  Grip Master
     A ‘hand-exerciser’ seemed the best choice for a physical object that: a)takes
  advantage of the full range of motion involved with the action of ‘gripping’, and
  b)provides real physical feedback/resistance to that action.
     The ProHands “GRIP MASTER” hand exerciser (available here) was quickly discovered
  and decided upon by Michael, who was drawn to several of this specific model’s key
  features. Among these were: each finger has its own independently but equally
  resistant pad, the palm has its own moderately rotating resistant pad, the devices
  are available in a number of different resistances, the small, transparent, yet
  solid construction makes the device easily upgradable, and its plastic body is
  naturally electrically insulated.
~
  Sensors & Sensing
     In order to translate the position of each of the GRIP MASTER pads to the
  computer as a number, Michael chose to attach magnets to each pad paired with
  Magnetic Hall Effect Sensors attached to the central body of the device. A 10-wire
  ribbon cable is used to connect the necessary Voltage (+5V) and Ground for each
  of the 6 sensors (each with a wire with which to take readings), and Voltage and
  Ground for an indicator LED (see circuit diagram and images below).  Each sensor
  and magnet pair needed to be directly aligned (on-axis) to ensure the most linear
  readings possible.  Two sensor/magnet pairs were placed on the palm pad in order
  to determine the angle of that pad.


 ~
~
  Mapping
     Utilizing excerpts of Max/MSP code by Daniel Jolliffe, “Arduino2Max,” Michael
  constructed a Max-patch (Serial2OSC.maxpat) that filters the incoming ‘analog’
  readings from the Arduino board, and broadcasts them via the U.C. Berkeley-developed
  UDP network protocol, Open Sound Control.  He then set up two programs in Ge Wang
  and Perry Cook’s ChucK to receive the messages (since ChucK is presently unable
  to receive data directly from the Arduino).
     The first program (GripMaestro-SinOsc.ck) maps the incoming floating point
  numbers (0. through 1.) of each of the four finger pads to a different sine
  oscillator’s frequency, and the palm pad to the sounds’ panning and overall
  amplitude.  This simple example demonstrates the degree of control that the
  performer has over musical materials with the “Grip Maestro.”
     The second program (GripMaestro-Granular.ck) is based upon code by Kyle
  Spratt from his piece, “I Miss My Uncle Charles.”  The original program listens
  to an incoming audio signal and parses it into small repeating “snippets”
  depending upon the variables that are given and controlled by the user by editing
  the ChucK code and replacing the already running “shred.”  In this mapping however
  the parameters of the program are controlled entirely by the “Grip Maestro”: the
  four finger pads control each of four sets of these original parameters where as
  the performer depresses a pad the amount of delay time increases, and the palm pad
  controls the playback speed of the audio signal, the size of the snippets, and the
  overall amplitude.  The use of the “Grip Maestro” allows for much faster and smoother
  changes of these control parameters, which in turn produces a more personal,
  potentially emotive performance.
~
  Future & Other
     There have been many similar developments in hand-controlled electronic interfaces
  (of particular interest is S.T.E.I.M.’s Michael Waisvisz’s “Hands”). Many ‘glove’
  interfaces lack the physical feedback I have proposed here is necessary to produce a
  truly personal and emotive connection with the interface and the music it produces,
  whilst other ‘button-based’ hand controllers may themselves or their controlling-
  gestures be more complicated than need be for an audience to intuit the performer-
  interface relationship.  It is my hope with the “Grip Maestro” that I have addressed
  these issues and come to an interesting solution.
     The “Grip Maestro’s” simple design allows for strongly coupled performance and sonic
  result for both the performer and the listener and for many flexible mappings as I hope
  these examples have demonstrated.  The next mapping that I am developing uses the finger
  pad readings to control the formant information in a vocal synthesizer. Future sensor-
  additions to the “Grip Maestro” might include a gyroscope or accelerometer to account
  for the player’s position and/or movement.
~
CCRMA CONCERT ~ Granular 1.0 Video
The Road to the "Mach 2" (MUSIC 250B)
- Revising the Mach 1
- Hardware — I wanted to compress the physical footprint of my hardware set up as much as I could, while also leaving an efficient way to multipurpose my Arduino (i.e. use it for more than just this instrument, and in a quick-swappable way). I had a few ideas in mind for augmenting the current instrument design of the GRIP MAESTRO in order to incorporate more varied and dramatic gestures from the performer into the creation and control of the sound, and all of them involved additional sensors of some type or other. For this reason I would need to multiplex the signals coming from the GRIP MAESTRO in order to handle the additional incoming signals.
- The two primary design ideas I arrived at were augmenting the GRIP MAESTRO with:
- an accelerometer — In particular this one. I had done a lot of mapping experiments for my and Luke Dahl's piece composed for the Stanford Laptop Orchestra in the Spring of 2008, "Monk Wii See, Monk Wii Do". Mapping this sort of gesture seems only natural in augmenting the GRIP MAESTRO's control interface.
- some sort of bowing-like apparatus: this is by far the least-developed of the two augmentation ideas. I hope to attach some sort of resisting cord or pulley-system to the GRIP MAESTRO that would be held by the players opposite hand. The GRIP MAESTRO and this attachment could be pulled apart and pushed together similar to the way in which a String player pulls and pushes his/her bow across the strings of his/her instrument. Through various discussion about this that I have had with my fellow students (particularly those with more experience in manufacturing than me), it is clear that something along these lines would be possible, but for the present, I have decided to pursue the first of these two ideas fully, and then take 'it' from there.
- In order to reduce the physical footprint of the instrument, I have swapped the Arduino Diecimila for an Arduino Nano. As you can see, this micro-controller is greatly reduced in size, and is also more conducive to 'hot-swapping' of interfaces / circuit set-ups. The Nano sits ON a breadboard instead of requiring a breadboard be attached to it. In this way, I can have the GRIP MAESTRO set up remain intact on its accompanying breadboard and change only the micro-controller itself (and its software).
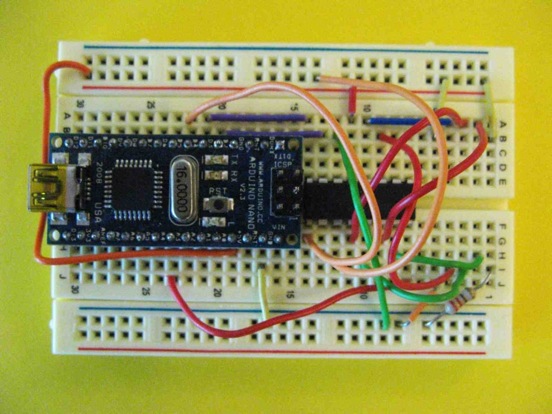
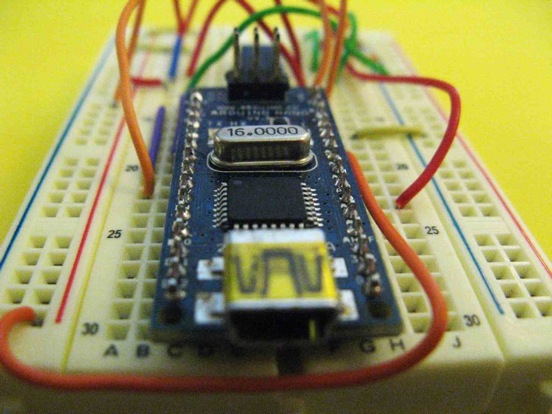
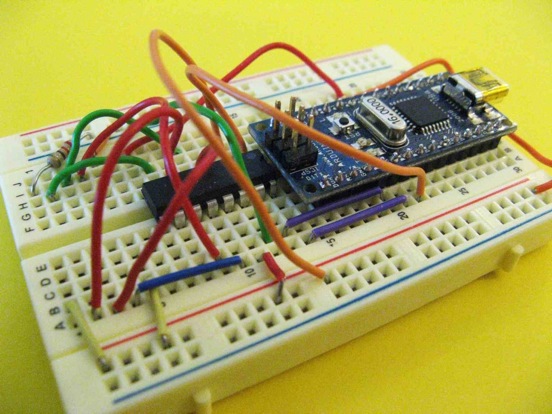


(The image below shows the Mach 1 connected to the new Multiplexed Arduino Nano with Small breadboard)

- Multiplexer 250a Page -- the multiplexer proved to be a very difficult thing for me for some reason... Wendy Ju and I got it working in the end; look in the software section below for the arduino code that saved the day. The multiplexer is necessary because the accelerometer returns three analog signals corresponding to its X, Y, and Z axes, and there are six HALL EFFECT sensors the each return one analog signal. I have only eight analog inputs on my Arduino Nano, and so multiplexing had to happen. I have chosen to multiplex the HALL EFFECT signals instead of the accelerometer signals because I felt time and temporal resolution would play a larger part in the genuineness of the accelerometer data, and by multiplexing a set of signals one is essentially lowering the sampling rate for each to one over n, where n is the total number of signals being multiplexed. This has allowed me to compress nine discrete analog signals into just four! SCIENCE!

- Having only four incoming signals allows for one of the most important upgrades for the GRIP MAESTRO Mach 2 over the original Mach 1: the instrument now consist of TWO separate GRIP MAESTROs! One for each hand of the performer. This, combined with the addition of the accelerometer will promote and even provoke much larger, energetic, and interesting performative gestures from the player! (in the image below the magnets are already installed, but are inbedded inside the finger pads themselves! -- see below for explanation)

- Software
- Arduino -- The Arduino software has been modified to add control over and handling of the multiplexer. Using three of the digital outs on the Arduino, the software send binary values zero through five to the multiplexer. This tells the multiplexer which of its inputs it should pass out its one output. By cycling through these inputs in very quick succession, the multiplexer is able to funnel (or seem to funnel) six analog signals through only one analog channel! Another digital output is used to turn the multiplexer on. Otherwise the Arduino code is the same as it was for the Mach 1. The new code may be seen here.
- Max/MSP -- there are very few adjustments made to the max patch, except for the important addition of push-button calibration for the varying signals that the HALL EFFECT sensors seem to produce. Future versions of this patch will include visualization of the accelerometer data, and twice the display (to accommodate two devices instead of one). The code may be seen here.
- Software

- Mappings
- Granular 2.0 -- I wanted to revise and polish the Granular synthesis patch that I had created for the Mach 1. I did so by reassigning the pads of the GRIP MAESTRO to more intuitive control parameters. In order to do this I had to carefully consider and balance the desired control over the sound for the user, with the physical limitations and quirks of the GRIP MAESTRO. After much deliberation and one failed performance of a "score" on February 13, 2009, I arrived at this mapping. I removed the functionality of the forth pad entirely to allow the performer to use his/her fourth finger more freely without interrupting his/her control over the sound. The two main sound-control pads are now the first and third fingers. The sonic effect of each is very similar and so the player is able to balance him/herself with the pad to allow even control (i.e. the player is not forced to tilt the palm-pad in one direction of the other, he/she can keep an even keel). This conjunctive control over the sound timbre leaves the second/middle finger free to control a relatively independent parameter of the patch, the sound buffer playback position (within the sample). This code still has potential in my eyes, but I have not yet achieved a satisfactory balance between the very particular control elements and the nature of the sound source being controlled. The results of this patch are often unpredictable, and delayed. This does not give the performer the feedback he/she needs to give a successful and engaging performance. The code may be found here.
- Vocal Synth (video forthcoming) -- In order to facilitate a more engaging performance, I returned to an idea that I had initially had shortly before the POSTER SESSION (see above), a "vocal synthesis"-like mapping that takes as its inspiration the work complete by Perry Cook during his time at Stanford, SPASM, and his chuck patch, the "Joy of Chant." For this GRIP MAESTRO mapping, I mapped the first three finger pad positions to the locations within one each of three arrays. These arrays contain the resonant vocal formants for human vowel sounds (aww through eee). The fourth finger pad controls the amount of resonance at each of these three frequency locations. As with previous mappings, the overall depression of the palm rest maps directly to the volume of the output signal, and the tilt of the palm-pad to the frequency of the output. In this case, as the palm-pad is tilted more towards the top of the hand (near the index finger and thumb) the output frequency is increased to its maximum. The sound that is outputted is a band-passed sawtooth waveform (with vibrato by frequency modulation) at the frequency given by the tilt of the palm-pad. I also included keyboard control over the mode in which the player may perform:
- keys "1","2", 3", "4", "5", and "6" control the scale/mode that will be played in
- keys "[", "]", and "\" control the key center of the mode ("[" and "]" decrease and increase the key by a semitone respectively, "\" returns the key to middle C)
- the "return" key toggles the vibrato off and on
- the "space bar" toggles the pitch-locking off and on, that is, when the space bar is pressed the pitch control given by the tilt of the palm-pad on the GRIP MAESTRO, will change from being in a 'key' and 'mode' to being continuous or vice-versa depending on the state it was in when the space bar was pushed. The player is given roughly one octave above and below the central "key" pitch when in "tempered" mode, and two octaves above and down to around 30 Hz, when in "Continuous" mode (tempered off).
- Mappings
This mapping has by far been the most successful yet, for the GRIP MAESTRO, but it is a little too anachronistic for my artistic side, I will be working with the GRIP MAESTRO Mach 2 to find some happy medium between the sound world provided by the Granular Synthesis patch and the control and engaging qualities given in the Vocal Mapping. The code for the Vocal Mapping patch may be found here.
- Expanded Intentions
- The Plan — The biggest difference between the Mach 1 and the Mach 2 has little to do directly with the hardware or software improvements (though these are of course very important contributing factors), instead it lies in the performative scope of the instrument. With the Mach 1 (as I have mentioned above), my most pressing goal was to develop an interface that gave the performer real-time realistic feedback so that he/she could develop a "report" with the instrument, and be able to emote with it. The gestures that are required of the Mach 1 are so small that there can be or usually is very little connection between the performer and the audience. It is this second relationship that is my focus for the Mach 2.
- New Parts
- Grip Master 3lb A lighter easier yet consistent resistance.

- Larger Breadboard — The Mach 1 male-connector fits snugly on the small breadboard presently being used to connect the Mach 1 GRIP MAESTRO to the Arduino Nano, but with the addition of the accelerometer in the Mach 2, and the further addition of a second unit, more room will be required. This breadboard was the next larger available breadboard at Radioshack the day I patronized them.


- Fatter Ribbon-Wire — These ribbon wires are longer and fatter than that which is used on the Mach 1. The added length should make larger performative gestures possible from the performer, until a wireless solution can be reached.

- Accelerometer — The accelerometer will be affixed to the back of each GRIP MAESTRO center-piece (palm-side). The ribbon wire will pass over top of the accelerometer and shield it from direct contact with the performers skin.

- New Construction (ongoing)
- Flush/Sunken Magnets — I dremeled/sanded/drilled concavities into the positions on the finger-pads where magnets would be glued. This allows for the magnets to sit flush against the underside of the pads and gives a greater distance between the magnets and the HALL EFFECT sensors, and therefore a greater resolution of signal data. They also look nicer.


I experimented with using EPOXY glue for the Mach 2 and was disappointed to find that not only was it less effective than the hot glue I used before, but it also was almost infinitely more difficult and time-consuming to attach the magnets. After many exasperating attempts, and only 2 successful affixings of magnets, I returned to the use of hot glue and was pleasantly surprised to find that not only did it work better than the EPOXY, but that it affixed itself even more easily to the pitted Mach 2 pads than to the flat Mach 1 pads. I used little clamps to hold the magnets in place over night to allow the glue to set fully on both Mach 2 GRIP MAESTROs.

- Extra Wires? -- The copper strips you see down the center-pieces of the Yellow Grip Masters are potentially to replace the ground wiring described above in the construction of the original GRIP MAESTRO.
- New Mappings (forthcoming)
GRIP MAESTRO: Mach 2
< FORTHCOMING, upon completion of project >
~Back to Top
Future?
< under construction >
- bluetooth ardiuino?
  "It is very difficult to make predictions, particularly about the future..."
                         -attrib. to Niels Bohr, possibly via Mark Twain