CCRMA Documentation links: index contents overview rooms account staff about
(contents of this file: links to each
section)
Laser Cutter – Garage
Room contents
- Epilog
Helix 40-watt, s/n 8040-14150332418R
- Desktop cart
- Desktop
- Mini Mac (USB port)
- LaserCutter USB for importing your projects to the desktop
- Manual safety gauge (small “V” shape metal piece)
- Air compressor (small grey unit)
- Quatro iSeries filtration unit
- Fan
- Material rack
- Cleaning supply box (Red Johnston tupperware box) on bottom
rack
- Fire extinguisher
- Not in the laser cutter room, but in the main garage space next to
the doorway into the back rooms
Materials it can cut/engrave
- Acrylic
- Acrylic comes with disposable film on both sides. Dispose the
protective adhesive paper from the back and place the front protective
layer side down on the rack (acrylic scratches easily).
- Optionally, add a layer of masking tape to prevent scorching stains.
Press it flat and make sure there are no bubbles.
- Wood
- Like acrylic, you can optionally add masking tape.
- Avoid construction grade material with lots of glue/particulates,
e.g., plywood or especially medium density fiberboard (MDF). It’s not as
efficient for the laser and can impede the cleaning job (extra dust can
catch fire).
- Engravable metal (no vector cutting on metal)
- Glass
- Cork
- Leather
- Paper
- Full
list here
Consult the laser approved materials list and familiarize yourself
with the safety protocol. Note that some materials can be engraved but
not cut. Additionally, there is a list of suggested speed/power settings
per material next to the desktop in the laser cutter room, as well as in
the manual (Appendix B: Material Settings). Using improper settings
may lead to a fire hazard, so always refer to the recommendations.
Software
For sending your design to the laser cutter, “this model of machine
will only work on a windows operating system.” Epilog recommends Adobe
Illustrator or Corel Draw. (Also they have a workflow with Inkscape, but
it requires special drivers (zip
file from Epilog for 64 bit versions of windows) and you have to
export to pdf and print the pdf from Adobe Acrobat.)
You don’t need to worry about that if you just use the CCRMA
laser cutter Windows machine:
- Account is “laser cutter” and has no login
- Corel Draw is the software that “talks” to the Helix. As far as
Corel Draw is concerned, the Helix is just another printer.
- Get your files onto this machine via USB stick and/or Internet
- Open your design file(s) in Corel Draw
- Corel Draw can read Adobe Illustrator files. It even gets the
“layers” right.
Creating a design
- Create a new document and specify your material’s dimensions in
inches in the initial set-up window.
- For a vector cutting design, you must use a “hairline” line
thickness, or 0.001 inches, for the laser cutter to interpret it as a
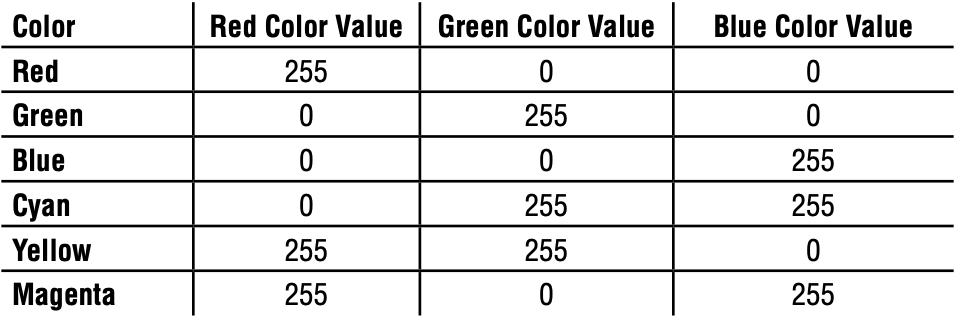
vector. Use only RGB value combinations of 0 or 255 such as black (0, 0,
0), or refer to the chart below. Anything else will be ignored.
- Line thickness doesn’t apply to raster engraving – any thickness or
continuous shade/gradient is fine. However, appropriate RGB colors still
matter. Below is a chart of the RGB values from the manual:
- If your design includes both raster engraving and vector cutting,
separate those portions in different layers.
- Tip: use different basic RGB colors to indicate a raster engraving
or vector cutting job (e.g., black (0, 0, 0) for vector and red (255, 0,
0) for raster).
- The Helix is very precise but material placement is not, so leave
yourself a margin of error in your template.
- Tip: If you’re working with acrylic, horizontally mirror your design
(left to right) so the laser will be engraving the backside.
Safety protocol
All general shop rules apply to using the laser cutter (e.g., always
wear shop glasses, only closed-toe shoes, tie long hair back). Here are
some important fire safety tips to remember:
- Never leave the Helix unattended when cutting material!
- Some materials can literally burst into flames, even if commonly
used.
- Always make sure there is proper ventilation (iSeries and standing
fan).
- If a small fire is sparked, open the lid immediately (this will stop
the job).
- Blow it out if it continues burning.
- If it’s larger than that, put it out with the fire extinguisher in
the main garage room.
- If it’s unmanageably huge, evacuate and call 911.
Setting up the Helix
- Turn on the power switch on the lower left next to the power
cable.
- Open the glass lid and place your material on the honeycomb
rack.
- Press “X/Y Off” then “Go” to off to disable motors so you can move
the laser by hand; display will flash “X/Y Disabled”. Press the
“Pointer” button to turn on a little red dot, then manually position the
laser head at the material’s “origin” (top left corner).
- If your material is not flat, you must manually focus the laser on
your material (otherwise, it’s your choice, though auto-focus poses
potential risks to the machine). Make sure the engraving area is still
relatively flat.
- To manually focus: after completing step three, put the manual focus
gauge on the carriage and press the “Focus” button. Then, use the up or
down buttons to move the table until the gauge touches a midpoint
between the lowest and highest parts of your material. Then, press
“Reset”. The carriage should return to the upper left corner and your
focus height will be saved.
- Press “Set Home” and “Go”, then press “Pointer” to turn it off.
Close the glass lid.
- Press “Reset”. The display says “Job: “ which indicates the default
state of the Helix waiting for a job. The Helix is now ready to receive
instructions from Corel Draw.
- Turn on the air compressor (small grey metal device under the Helix)
and press the red power button on the iSeries filtration unit (large
white box with tube). Both must be turned on while laser cutting.
- For acrylic projects, additionally turn on the standing fan next to
the door.
- You have a choice of opening the door leading outside (on your right
when facing the Helix) during your print. Opening it may give you
additional ventilation, but the extra heat and dust can affect the
laser’s performance.
Printing Your Design
to the Laser Cutter
- Confirm the “paper size” as 24x18 inches (or smaller)
- Corel Draw: Layout > Page Size… >
- Illustrator…? XXX
- If your project involves both raster engraving and vector cutting,
raster first. Hide the vector layer (or any other raster layers if doing
multiple intensity rasters) by clicking the eye icon next to the
layers.
- Press “Control + P” to print. Choose “Epilog Engraver WinX64” as the
printer.
- Click the settings icon next to the selected printer (looks like a
gear) to bring up Epilog’s settings window.
- In the Epilog window (which has distinctive graphics), start by
selecting “Raster” or “Vector” as the job type (depending on your job).
Do not select “Combined.” Then, set your resolution in dots per inch
(DPI); between 300-600 DPI is standard for most purposes (higher = more
detailed).
- Refer to the wooden chart behind the desktop and/or the manual’s
suggestions for laser speed/power/frequency per your material. For
example, the chart suggests 60%/100% for a 600 DPI raster job on wood.
Input your settings.
- Make sure auto-focus is checked and the piece size matches your
material’s dimensions. (Epilog’s settings seem to revert to 8.5 x 11
even if you already told Corel Draw that your “piece” is 24 x 18
inches.)
- Do not check auto-focus if you manually focused.
- Press “OK” when done with the Epilog window, then “Apply” to save
your settings.
- Double check that your file’s media size matches the material’s
dimensions (use inches).
- Now click the “print” button. This will send the job to the
Helix.
- Press “Go” on the Helix to start laser cutting.
- If your project involves both vector cutting and raster engraving,
repeat steps 7-15 for each layer and change the Epilog window settings
accordingly.
- If you need to stop the job at any time (e.g., if something catches
fire), the quickest way is to lift the glass lid. You can also press
“Stop” on the Helix, but this is slightly slower.
- When your job is done, press the trash icon on the Helix.
Cleaning the laser cutter
- General cleaning
- Vacuum the crumb tray (inside the machine, see below) as often as
possible.
- Move the computer out of the way, then open the front door. Turn on
the air compressor to remove dust buildup.
- Use a q-tip soaked in 99% isopropyl alcohol to clean the auto-focus
plunger tip.
- Optics (mirrors and lenses)
- About once a week (during heavy usage) or if dust builds up, the
optics may need cleaning.
- First, press “X/Y” and set “Go” to off to disable motors and move
the laser by hand.
- Use a q-tip soaked with the optics cleaning solution to lightly swab
the lens, taking care not to rub or push. Hold the q-tip loosely and
spin the head to remove impurities.
- If the optics cleaning solution runs out, use the 99% isopropyl
alcohol in the cleaning supply box instead.
- Crumb tray
- If small pieces fall through the honeycomb while cutting, open the
laser’s front access door to slide out the crumb tray and clean debris.
- This becomes a fire hazard if not regularly checked and
cleaned!
- Advanced (for staff performing maintenance)
- The honeycomb grid can be cleaned by immersing
in a diluted degreaser. Otherwise, it can be replaced through
Epilog.
- Cleaning materials
- Drain pan large enough to fit 24”x18” grid
- Zep Industrial Purple Degreaser
- Hot water
- Bucket for hot water
- Hazardous waste container (for dumping all Zep contaminated water)
- Virtually any container that can be sealed shut and won’t leak if
you turn it upside down
- Pipe cleaner (optional)
- Rubber gloves
- Safety goggles
- Use 1 part Zep Industrial Purple Degreaser to 10 parts hot water (or
1:5 if the grid is very dirty) to fill the drain pan. Submerge the grid
for no more than 1-2 minutes, dump the cleaning mixture out of the tray,
then rinse the grid with water in the tray. Optionally, use a pipe
cleaner to remove debris stuck in the honeycomb. Let the grid dry
completely before reattaching it to the laser. Finally, dispose of the
waste by submitting a Stanford hazardous waste
pickup request.
- Do not dispose of any Zep or Zep contaminated water in a sink or
storm drain. You must file a waste pickup request.
- Avoid sunlight and conduct the process in an area with good
ventilation (e.g., shaded outdoors).
- Avoid soaking for longer than 2 minutes or the grid can be damaged
(the coating may wear off).
- The Zep degreaser is very powerful. Wear safety goggles, a mask,
rubber gloves, closed-toe shoes, and cover exposed skin when using
it.
- Air intake comes from four holes in the machine’s rear – keep them
clean.
- Use a q-tip soaked in 99% isopropyl alcohol to clean along the
X-axis bearing rail. Gently move the X-axis belt out of the way to
access the rail, being careful not to tug at the belt.
- There is an extra X-axis belt in the cleaning supply box to replace
the old one.
- If any other maintenance issues come up, contact Matt.
This page of CCRMA documentation
last committed on Wed Jul 26 13:04:07 2023 -0700 by Nils Tonnaett.
Stanford has a page for Digital Accessibility.