CCRMA Documentation links: index contents overview rooms account staff about
(contents of this file: links to each section)
CCRMA has several DM1000 mixers, in Studio C, Studio E, and the Stage (plus a spare in 101).
Eoin Callery’s Quick Start Guide to the DM1000, has lots of step-by-step instructions with pictures for accomplishing common tasks at CCRMA, and is mostly up to date.
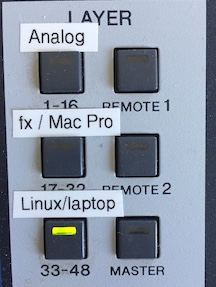
The blessing and the curse of digital mixers with motorized faders is a modal interface allowing a relatively small number of physical faders to control a larger number of virtual channels by switching what the faders control.
Yamaha calls these LAYERS and provides a display/control
area on the right of the mixer in line with the SEL,
SOLO, and ON buttons. For example, when you
press the LAYER button 1-16 then the button lights up
(showing you which layer is selected) and the faders transition to
control inputs 1-16, if necessary jumping from their previous positions
(of what they used control before you pressed the button) to the current
values for inputs 1-16.
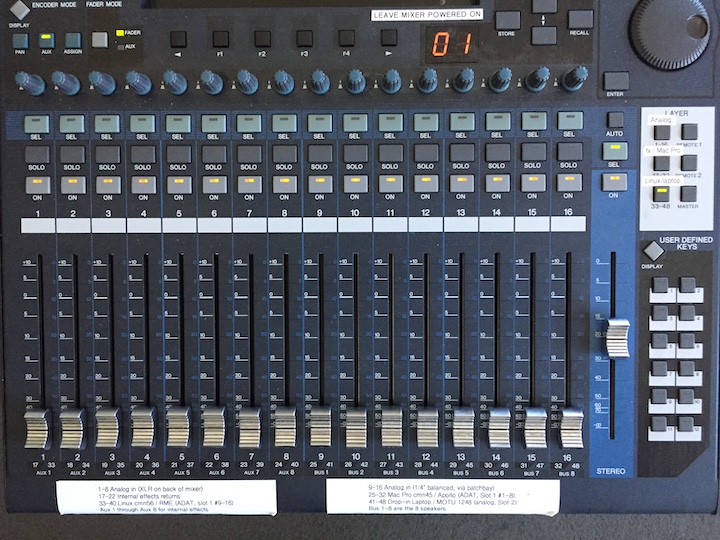
The small screen of the DM1000 can display dozens of different pages of information. The “DISPLAY ACCESS” buttons to the left of the screen allow you to access these various pages. Here are some of the more popular pages:
DIO: Lets you set digital I/O parameters including the
sampling rateMETER: allows you to view input signal levels across
the mixerSCENE: allows you to store and recall presetsEFFECT: accesses the reverb and other built-in
effectsOne incredibly bad thing about the DM1000 is that sometimes moving a fader (especially multiple faders simlutaneously?) doesn’t always register. The fader physically moves as you slide it, but somehow the DM1000 “isn’t paying attention” to the position of the fader, so that moving the fader doesn’t change any gain. If you just wiggle the fader up and down for a few seconds it always starts paying attention again.
Beware of gradually trying to turn something up, not hearing any effect, and turning it up more and more and more - when it suddenly notices the fader position you don’t want it to be uncomfortably loud.
You might want to go to the METER screen to see the
actual fader values (in dB) and verify that the
number changes when you wiggle a fader. Note the tiny tiny decimal point
that differentiates 45 dB from 4.5 dB. The
fader’s maximum value is 10.0 dB of gain, not
100 percent (which would actually be 0.0
dB).
Every CCRMA DM1000 connects to 4-8 loudspeakers in the same way: through the mixer’s 8 busses, with bus 1 going to speaker 1, etc.
So to route a signal to a speaker:
SEL button to select the channel.Routing labeled 1 through
8 are showing you which channel(s) this signal is routed to; press any
button to toggle whether this signal goes to the button’s corresponding
speaker. Note that the spatial arrangement of these buttons in four
stereo pairs mimics CCRMA’s usual stereo-pair-based speaker layout and
numbering convention, making a pretty easy and logical spatial map
between the rectangle of 8 buttons and the quasi-circle of 8
loudspeakers.XXX a photo would be nice here
The DM1000 can store and recall presets in its
SCENE MEMORY. The presets are numbered from 0 to 99.
The pair of red seven-segment displays shows you the 2-digit number of the current (most recently recalled) preset. A little red dot where you might expect to see a decimal point will blink if the DM1000’s current settings are different from the preset’s.
Preset number 1 should be CCRMA GOOD and it should
configure everything you need in the studio for 99% of uses.
This preset has all the volume faders down all the way so you don’t get blasted; once you select it you should go to the right “layer” so the faders control the input channels you’re using and then slowly and carefully turn them up to a comfortable listening level (being mindful that sometimes the mixer doesn’t “notice” when you move the faders) .
If you need to save exact gain levels, custom routing of channels to specific
loudspeakers, or anything else, then please save to a
different preset. Under DISPLAY ACCESS (to the
left of the LCD) press the diamond-shaped SCENE button, if
necessary pressing repeatedly to get to the leftmost tab
SCENE where you can scroll through the entire scene
memory.
This is where you see how the physical audio inputs map to the 48 virtual “input channels” of the mixing board interface.
Under DISPLAY ACCESS (to the left of the LCD) one of the
diamond-shaped buttons is INPUT PATCH. Press this to bring
the display to IN PATCH. You want the leftmost tab
IN PATCH.
Now you see all 48 virtual input channels of the mixing board interface (in 6 rows of 8 channels each) and can assign each to a specific physical input.
The INPUT PATCH LIBRARY (the rightmost tab of the
INPUT PATCH interface) is a separate preset system for
input patches. These can optionally be linked to a scene in the overall preset system. Talk to CCRMA staff for help saving custom input patching
for your project.
This is where you control which virtual mixer output channels (bus 1-8, aux 1-8, stereo main mix L+R, control room L+R, inserts, “surround” outputs, etc.) appear on which physical audio outputs.
Under DISPLAY ACCESS (to the left of the LCD) one of the
diamond-shaped buttons is OUTPUT PATCH. Press this to bring
the display to OUT PATCH. You want the leftmost two tabs
SLOT OUT and OMNI OUT
The main analog outputs are OMNI OUT and typically
correspond to the output loudspeaker channels. We generally feed these
from BUS1 through BUS8.
In Studio E, Slot 1 has an ADAT card that digitally sends and receives 8 channels to and from both the Mac Pro and the CCRMA Linux Workstation.
The OUTPUT PATCH LIBRARY (the rightmost tab of the
OUTPUT PATCH interface) is a separate preset system for
output patches. These can optionally be linked to a scene in the overall preset system. Talk to CCRMA staff for help saving custom output patching
for your project.
This page of CCRMA documentation last committed on Thu Sep 26 14:33:57 2019 -0700 by Matthew James Wright. Stanford has a page for Digital Accessibility.