Music 3SI
Week 6 Online Tutorial
Introduction to Audio/Multimedia Application Programming
Announcements | Course Info | Weekly Schedule | Tutorials | Links
Week 6 Online Tutorial: Qt GUI Programming with Stk
0. Qt @ CCRMA
To quote the CCRMA software page, Qt is "a GUI software toolkit that simplifies the task of writing and maintaining GUI (Graphical User Interface) applications for the X Window System. Qt is written in C++ and is fully object-oriented." Qt (ver. 3.3) is part of the Planet CCRMA package, and can be used from any of the CCRMA Linux machines.
This tutorial will walk you through the steps to make a simple Stk GUI application with Qt in CCRMA Linux environment.
This tutorial will walk you through the steps to make a simple Stk GUI application with Qt in CCRMA Linux environment.
1. Qt Designer
We begin with Qt Designer to create a Qt project and design its GUI first. Run it by choosing Programming > Qt Designer, or by typing designer in Terminal.

Choose C++ Project, click Ok, and save the project. For this example, we save it as BeeThree.pro under ~/BeeThreeEx/.

Choose C++ Project, click Ok, and save the project. For this example, we save it as BeeThree.pro under ~/BeeThreeEx/.
Tip: "Save All"
Every time you create/modify a new project/file/form, you need to save the change(s) you made. Failing to do this may result in compiling errors.
To make sure you have everything up to date, I would recommend that you choose File > Save All (or [Alt-F] - [V]) to store all the file in the project at every step.
To make sure you have everything up to date, I would recommend that you choose File > Save All (or [Alt-F] - [V]) to store all the file in the project at every step.
2. Dialog
The first GUI component we need is a Dialog, which is like a window or a panel. Go to File > New, and choose Dialog.

A new dialog Form1 should appear inside the Qt window.

Save this (File > Save) as BeeThreeForm.ui.

A new dialog Form1 should appear inside the Qt window.
Save this (File > Save) as BeeThreeForm.ui.
3. Widgets
Now it's time to design our GUI. Resize Form1 as appropriate, and place GUI widgets by choosing one in the toolbox (left) and dragging on the form. More information on basic Qt GUI design (and more) can be found at this page.
For BeeThree, we need the following widgets:
For BeeThree, we need the following widgets:
- a pitch slider (Input / Slider)
- a pitch value edit (Input / LineEdit)
- a start (sound) button (Buttons / PushButton), and
- a stop (sound) button (Buttons / PushButton)
It is highly recommended that you rename the widgets & the form for use as class instances, which will be discussed later. For example,
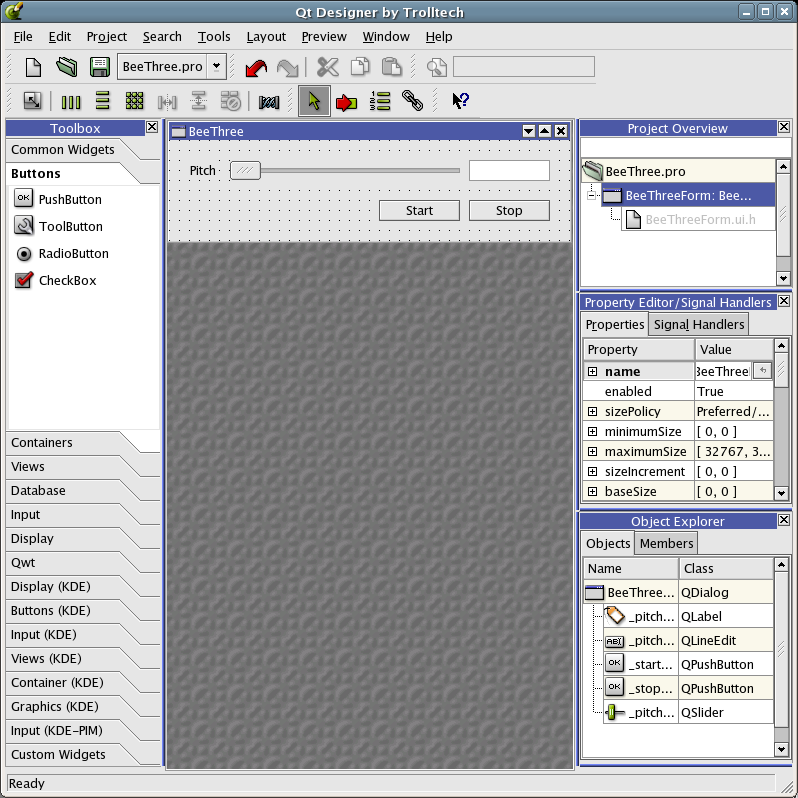
- pitch slider: _pitchSlider
- pitch edit: _pitchEdit
- start button: _startButton
- stop button: _stopButton
- label: _pitchLabel, and
- form: BeeThreeForm
Preview
Test your interface by choosing Preview / Preview Form. If everything works as expected (it should!), save the form.

C++ main file
One last step before compiling is to create the main.cpp file for this project. Go to File > New, and choose C++ Main-File (main.cpp). Make sure its Main-Form is BeeThreeForm.
main.cpp will appear in the Designer window. Save the file, and close its window (since it won't be edited).

main.cpp will appear in the Designer window. Save the file, and close its window (since it won't be edited).
4. Compiling
Using terminal, go to the directory that contains the project file (~/BeeThreeEx/) and see the files we've created.

Note that BeeThreeForm.ui is actually an XML file containing information of the form BeeThreeForm and its GUI widgets.
Note that BeeThreeForm.ui is actually an XML file containing information of the form BeeThreeForm and its GUI widgets.
qmake
First we run qmake, which configures Qt settings and creates a Makefile and some new directories.

make
Now run make to "really" compile the whole project. It will compile successfully (with some warnings that can be ignored for now).
Again, check the list of files to see the executable BeeThree. Also, pay attention to the new .ui directory: this is where the Qt-generated GUI implementation files are stored.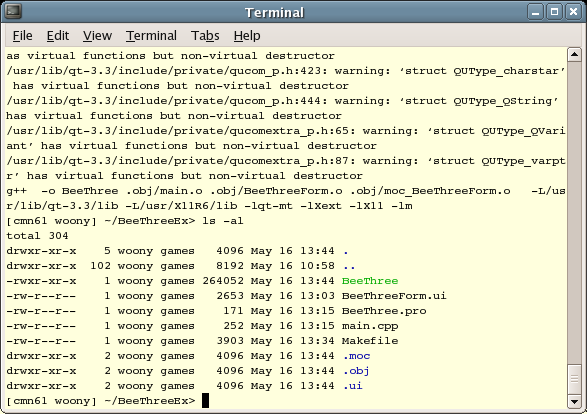
Again, check the list of files to see the executable BeeThree. Also, pay attention to the new .ui directory: this is where the Qt-generated GUI implementation files are stored.
5. Connections: Signals & Slots
To make GUI widgets actually work, we need to connect them to some functions of the program. Speaking in Qt language, we need to connect the Signal (action) from a Sender (GUI widget) to one of the Slots (functions/methods) of a receiver (class that we implement: BeeThreeForm in this example).
 Sender		--(Signal)-->	   Receiver  	----	Slot 1
[Widget]	  [Action]	    [Form]	 |-	Slot 2
							...
						 |-	Slot n
For most sender actions, the main form (BeeThreeForm) becomes the receiver.
Slots
First, create slots: you can think of them as the methods of BeeThreeForm class that is invoked by certain widget action.
Choose Edit > Slots to open Edit Fucntions panel, and add the followings:
Choose Edit > Slots to open Edit Fucntions panel, and add the followings:
- pitchSliderMoved()
- pitchEditEntered()
- startButtonClicked()
- stopButtonClicked()
Connections
Open up the View and Edit Connections panel (Edit > Connections) to map the signals (actions) of GUI widgets to the slots created above.
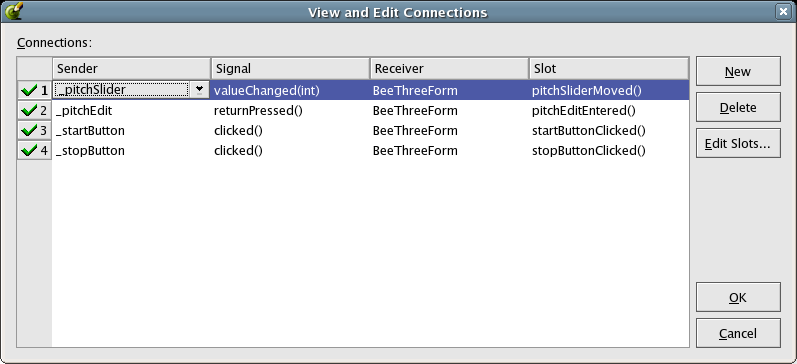
- _pitchSlider | valueChanged(int) -> BeeThreeForm | pitchSliderMoved()
- _pitchEdit | returnPressed() -> BeeThreeForm | pitchEditEntered()
- _startButton | clicked(int) -> BeeThreeForm | startButtonClicked()
- _stopButton | clicked(int) -> BeeThreeForm | stopButtonClicked()
Two more functions
Although we've made all the connections necessary, we are still missing two important methods of BeeThreeForm: init() for initialization, and destroy for destruction (note that their type is functions, not slots).

BeeThreeForm.ui.h
Now save everything, and check the BeeThreeForm.ui.h file (see Project Overview panel on right). This file contains the "empty" implementations of the slots/functions we created, which will be filled with our Stk codes.
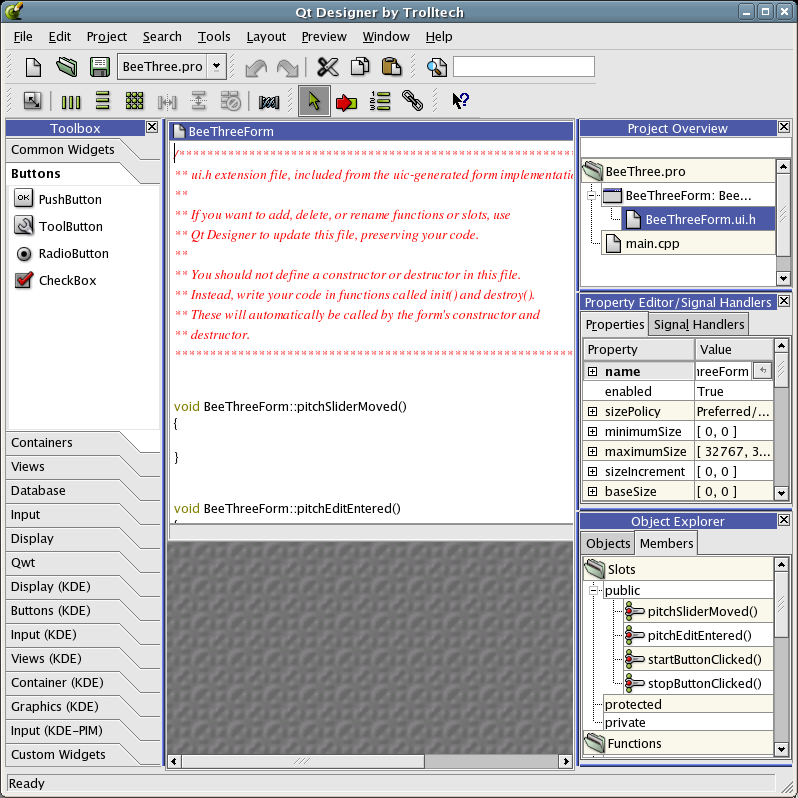
Wait a minute! What's exactly going on here?
This chapter of Qt Designer Manual will tell you more about the design approach we took (see The ui.h extension approach.)
6. Stk Implementations
Like its Cocoa counterpart, this BeeThree can be considered as a GUI version of ex11. You might want to compare their source codes to see their process flows.
Qt's class documentation can be found here
Qt's class documentation can be found here
BeeThreeForm.ui.h
/****************************************************************************
** ui.h extension file, included from the uic-generated form implementation.
**
** If you want to add, delete, or rename functions or slots, use
** Qt Designer to update this file, preserving your code.
**
** You should not define a constructor or destructor in this file.
** Instead, write your code in functions called init() and destroy().
** These will automatically be called by the form's constructor and
** destructor.
*****************************************************************************/
// Stk header files
#include "BeeThree.h"
#include "RtAudio.h"
// Callback function
int tick(char *buffer, int bufferSize, void *dataPointer) {
BeeThree *beethree = (BeeThree *) dataPointer;
StkFloat *samples = (StkFloat *) buffer;
for ( int i=0; i<bufferSize; i++ )
*samples++ = beethree->tick();
return 0;
}
// Pointers to Stk instances
BeeThree* _beethree;
RtAudio* _dac;
// Slot for slider signal
void BeeThreeForm::_pitchSliderMoved()
{
printf("slider moved!\n");
int pitch = _pitchSlider->value(); // _pitchSlider: see QSlider
_beethree->setFrequency((float) pitch);
_pitchEdit->setText(QString::number( pitch, 10) ); // _pitchEdit: see QLineEdit
}
// Slot for line edit signal
void BeeThreeForm::_pitchEditEntered()
{
printf("edit entered!\n");
bool ok;
int pitch = _pitchEdit->text().toInt(&ok, 10);
if (ok) {
_beethree->setFrequency((float) pitch);
_pitchSlider->setValue(pitch);
}
}
// Slot for start button
void BeeThreeForm::_startButtonClicked()
{
printf("start!\n");
_dac->setStreamCallback(&tick, (void *)_beethree);
_dac->startStream();
}
// Slot for stop button
void BeeThreeForm::_stopButtonClicked()
{
printf("stop!\n");
_dac->stopStream();
_dac->cancelStreamCallback();
}
// Initialization
void BeeThreeForm::init()
{
printf("init!\n");
Stk::setSampleRate( 44100.0 );
float frequency = (float) _pitchSlider->value();
_beethree = new BeeThree();
_beethree->noteOn( frequency, 0.7 );
RtAudioFormat format = ( sizeof(StkFloat) == 8 ) ? RTAUDIO_FLOAT64:RTAUDIO_FLOAT32;
int bufferSize = RT_BUFFER_SIZE;
_dac = new RtAudio(0, 1, 0, 0, format, (int)Stk::sampleRate(), &bufferSize, 0);
}
// Destruction
void BeeThreeForm::destroy()
{
printf("destroy!\n");
delete _dac;
delete _beethree;
}
7. Compile & Run!
Finally, check the project options for libraries and paths. Choose Project > Settings, and enter the followings:

Save the project, and do qmake - make again to compile the project.
- Libs: -lstk, -lasound, -ljack
- Includepath: /usr/include/stk
Save the project, and do qmake - make again to compile the project.
Download
BeeThree.qt.zip
Links Summary
Acknowledgements
Special thanks to Moonseok Kim for reviewing and debugging the codes!
Announcements | Course Info | Weekly Schedule | Tutorials | Links
Music 3SI / Spring 2006 / CCRMA, Stanford University
Woon Seung Yeo
Last updated: Wed, 24 May 2006 3:57:08 -0700
Woon Seung Yeo
Last updated: Wed, 24 May 2006 3:57:08 -0700