PadMaster: an interactive improvisation environment
by Fernando Lopez-Lezcano
User's Manual
Introduction
PadMaster is an interactive improvisation environment written in Objective-C. [more bla bla needed here]
Basic Concepts
The performer interacts through the selected controller with a virtual surface that is modelled on the screen of the computer. This virtual surface contains one or more Pads, which are the basic performance elements of PadMaster. Pads are arbitrarily sized, non-overlaping sections of the surface and can be triggered through actions of the performer. A set of Pads defined within the same surface are called collectively a Scene. PadMaster allows an indefinite number of Scenes to be defined. The performer interacts with the current Scene (which is the one shown on the computer screen) and can switch between Scenes during the performance, in effect redefining the behavior of the virtual surface. A Pad can be performing even though its Scene is not the current one, that is, the performer can trigger Pads in one of the Scenes and then move on to another while the Pads keep performing in the background.
PadMaster documents
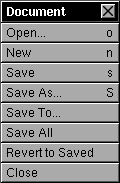
PadMaster is a document oriented program. You can have more than one document open at a given time, each one will have its own browser window. The selected controller will control only the selected document (the document that is the current key window). The normal "Document" submenu of the main application menu contains all the standard NeXT commands:
- Open...
- Open an existing PadMaster document. The extension for PadMaster documents is "padmaster".
- New
- Create a new and empty document. The document will be created with no scenes or pads.
- Save
- Save a document.
- Save As...
- Save a document under a different name.
- Save To...
- Save a document as a different type. NOTE: This option is not working yet, it will be able to save the document as an ASCII file that can be latter be edited with a conventional editor. The purpose is to be able to modify or create PadMaster documents with external programs.
- Save All
- Save all modified documents
- Revert to Saved
- Revert a document to the latest saved version
- Close
- Close a document
| 
|
|---|
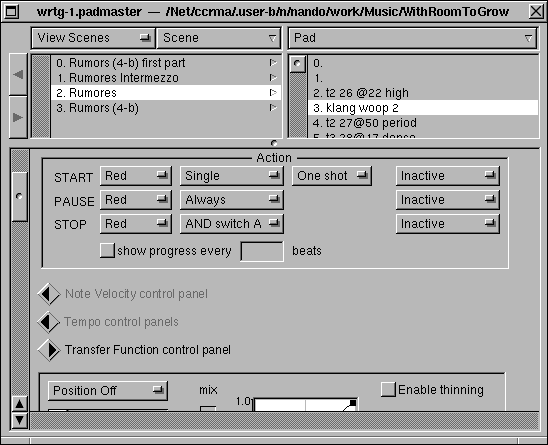
The Browser
| 
|
|---|
| The scene browser is the current
editing interface to a PadMaster document. This is how the browser
looks like once you have created some scenes and pads:
|
|---|
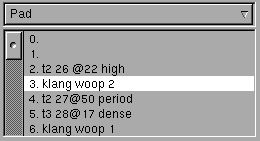
The upper left hand browser or View Pane shows by default a list of the currently defined scenes. The right hand browser or Pad Pane shows a list of all defined pads for the currently selected scene. The lower pane or Editing Pane shows all editable parameters of the currently selected scene or pad. The Editing Pane can also show global document parameters if no scenes are selected. To deselect all scenes <SHIFT> click on the currently selected scene.
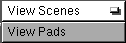
View Pane
| 
|
|---|
| The View Pane is a list of
entities. What it lists depends on the selected mode. There are
currently two modes, "View Scenes" and "View
Pads". You can select which one is active by clicking on the view popup menu. In any case an item in the
list can be selected by clicking on it.
|
|---|
If the list is in "View Scenes" mode, a particular scene can be selected by clicking on it. Double clicking will make that scene the current scene in the performance surface.
The popup menu on the left lets you change the current mode of the View Pane.
|
- View Scenes
- The pane will show a list of all defined scenes in the document.
- View Pads
- The pane will show a list of all defined pads in the document.
|
|---|
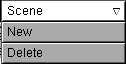
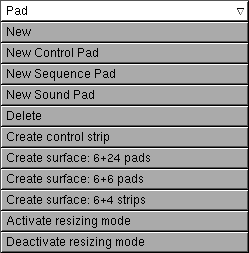
The pulldown menu on the right holds the operations you can use to create and erase scenes when the View Pane is in the "View Scenes" mode.
|
- New
- This item will create a new empty scene in the current document. It actually creates two things: an entry in the list and a new empty scene in the performance surface. If there was a scene selected in the list, the new scene will be placed after it. If there was no selection the scene will be placed at the end of the list. Ordering is important as that determines which one is the "next" and "previous" scene. The list of scenes can be reordered by control dragging a scene to the desired place in the list.
- Delete
- This item will erase the currently selected scene. Nothing will happen if there is no selected scene.
|
|---|
Pad Pane
| 
|
|---|
| When the View Pane is in the "View Scenes" mode this pane will show a list of all existing pads within the currently selected scene. Even though ordering is not important, the pad list can be reordered by control dragging the selected pad to the desired location.
|
|---|
Here are the operation you can do when there is a selected scene in the View Pane.
|
- New Control Pad
- Creates a new Control Pad. If a pad is selected the new pad will be inserted in the list after it. If no pad is selected the new pad will be placed at the end of the list. The actual pad is created in the first free space found on the performance surface and its size will be 2x2 tiles.
- New Sequence Pad
- Creates a new Sequence Pad. If a pad is selected the new pad will be inserted in the list after it. If no pad is selected the new pad will be placed at the end of the list. The actual pad is created in the first free space found on the performance surface and its size will be 2x2 tiles.
- New Sound Pad
- Creates a new Soundfile Playback Pad. If a pad is selected the new pad will be inserted in the list after it. If no pad is selected the new pad will be placed at the end of the list. The actual pad is created in the first free space found on the performance surface and its size will be 2x2 tiles.
- Delete
- Erases the currently selected pad from the list and the performance surface. Nothing happens if there is no selected pad.
- Create control strip
- Creates a new control strip in an empty scene (currently the software is not checking that the scene is indeed empty). A control strip is composed of four 2x2 tiles Control Pads and two 2x2 Sequence Pads. The first two pads are a "go to previous scene" and "go to next scene" pads. The last two pads are a "pause/resume scene" pad and a "stop Scene" pad. NOTE:This item will probably move in the future to the Scene Pulldown Menu.
- Create surface 6+24 pads
- Fills a new performance surface with pads (currently the software is not checking that the performance surface is empty). NOTE:This item will probably move in the future to the Scene Pulldown Menu.
- Create surface 6+24 pads
- Fills a new performance surface with pads (currently the software is not checking that the performance surface is empty). NOTE:This item will probably move in the future to the Scene Pulldown Menu.
|
|---|
Pads
There are two basic types of pads, Performance Pads and Control Pads. Performance Pads can control playback of MIDI information or soundfiles. Control Pads can globally affect the Performance of a Scene.
Performance Pads
MIDI Pads
MIDI Pads control the performance of MIDI information. The editing pane of the browser will show a scrollable list of all configurable parameters. The first section is fixed, that is, contains required parameters. There are also optional parameters that are contained in "Elements". Each element is represented by a control strip and an editing pane. The control strip lets you hide or show the editing pane. These are the required parameters of a MIDI Pad:

Changes the name of the pad. The name is shown on the graphical representation of the pad in the performance surface and in the list of pads in the Pad Pane.

The controls on the left Pause/Resume, Start or Stop the performance of the pad. Highlighting reflects the current state. The controls on the right define the MIDI port and channel where the MIDI data is sent and an optional program change number. If the program change number is defined it is sent on the selected port and channel right before the first performance of the pad. This feature enables sharing of a particular port and channel by several different pads, each one using a different program change number (which means a different patch in the attached synthesizer). As soon as a pad that has a program change number enabled starts performing, all other pads in the document that transmit information on the same port and channel but have different program change numbers are disabled.
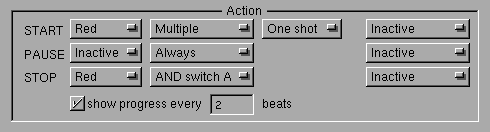
This pane defines how a pad is triggered and what action occurs when the trigger condition happens. There are currently three possible actions. The first row defines the START action. From left to right, the first popup defines which trigger will activate this particular action (in the case of the Radio Drum the options are the Red or Blue batons). The second popup defines the action that will happen when the trigger is recognized:
- Multiple
- Each recognized trigger will activate a new performer. There can be an indefinite number of performers playing simultaneously in a pad.
- Single
- Only one performer will be started. If a performer is already active and a trigger is detected, the velocity information for the performer will be updated.
- Notes
- Each recognized trigger will play the next note in the performance. As the sequence is a MusicKit scorefile the notes can be NoteDurs (in which case the trigger plays the note including the note off messsage) or NoteOns and NoteOffs (in which case the trigger will start a note or end it).
The third popup defines whether the playback of the performance for the pad will be Single Shot or Looping.
The last popup defines a global action when the START trigger is recognized. Current options include:
- Stop all
- Stops all currently performing pads in the current scene, except for the pad that is receiving the trigger.
- Pause all
- Toggles the pause state of all performing pads in the current scene, except for the pad that is receiving the trigger.
The second and third rows define the PAUSE/RESUME and STOP actions. The significative difference with the START action is that both can be disabled and that there is a possible qualifier that takes into account shift states (in the case of the Radio Drum the two available foot pedals).
The last option enables updating the remaining beats to be played in the graphical representation of the pad in the performance surface.

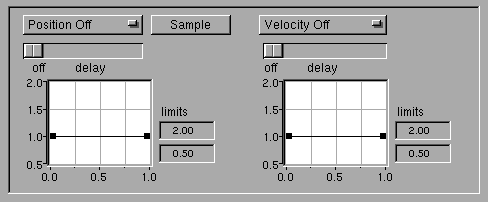
Note Velocity control element
This optional element controls note velocity. There are two sources of control information or inputs. The first is one axis of continuous control information and the second is the velocity or force information of the trigger event. Both go through individual filters that can be used to smooth abrupt transitions and are mixed before being used as an index into the transfer functions.
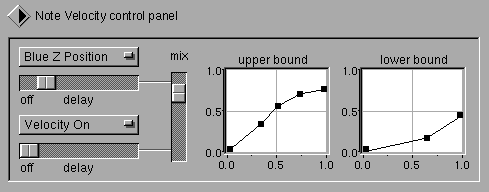
The transfer functions represent the upper and lower limits over which the velocity information of notes will be interpolated. First the mixed input is used to find the upper and lower bounds of note velocity by indexing into the two transfer funtions. Then the existing note velocity is interpolated into that range. If there is no velocity information in the note to be performed the upper transfer function will be used as a normal lookup table.

Tempo control element
This optional element controls performance tempo. The first popup defines the source of tempo information:
- Sequence
- An independent conductor will be allocated for each performing sequence in the pad.
- Pad
- Only one conductor will determine tempo for all performing sequences within the pad.
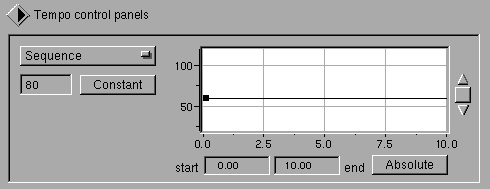
The button selects the tempo value. It can either be a constant or can be controlled through a tempo envelope. If the latter is selected you can graphically edit the tempo envelope. The abolute / relative button selects from where the tempo envelope starts measuring time. If absolute is selected the time is measured from the beginning of the performance of the pad (that is, if the pad has more than one performer activated, all performers share the same concept of time). If relative is selected the time is measured from the start of the performance of each performer.
The previously selected value of tempo (constant or envelope) is further modified by two multipliers. The input of the first (on the left) is one axis of continuous control and the input to the second is trigger velocity. Both go through smoothing delays before being input to the transfer function.

Transfer Function element
This optional element lets you map one axis of continuous control to a MIDI continuous controller.
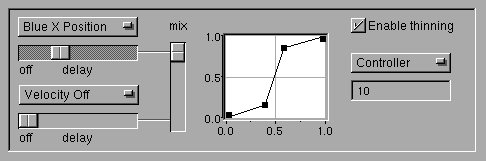
The input block is similar to that of the Velocity control element. The two inputs (one axis of control and trigger velocity) are delayed and mixed before being input to the transfer function. The output of the transfer function is converted into controllers, pitch bend or channel pressure MIDI messages. The check box can be used to enable or disable controller filtering.

Score element
This element holds a MusicKit MIDI scorefile. It contains a scrollable text object that contains the scorefile. The scorefile can consist of only one part that is performed in the previously selected MIDI port and channel.
Soundfile Playback Pads
Control Pads
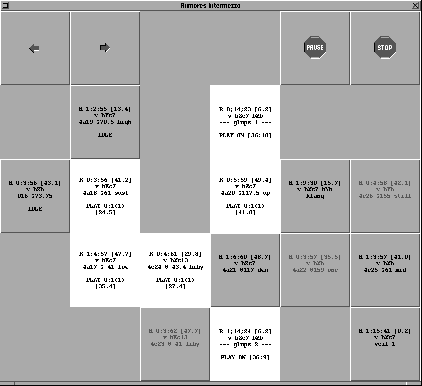
The Virtual Performance Surface
| 
|
|---|
| The virtual performance surface is the on screen representation of the controller surface. In the case of the Radio Drum or a Graphics Tablet it maps the actual surface of the controller to the screen. Pads in a Scene are represented by buttons that show the current state of the performance.
|
|---|
Pad Editing
Size and Position in the performance surface
The size and position of pads can be graphically edited directly in the performance surface. To enter the editing mode <Command> click on one of the pads. The appearance of the pad will change from the normal mode:

to editing mode:
To exit the editing mode just <Command> click again. Clicking on one of the handles and dragging will change the size of the pad. In the current implementation the size will jump in multiples of the basic size unit, the tile (the default size for new pads when using the Radio Drum as the controller is a 2x2 tile square). When changing size the adjoining pads will also change size, the pad being resized remains "glued" to them. Clicking outside the handles and dragging will move the pad to a different position. Currently you cannot move the pad jumping over existing pads (there has to be space for the pad in the new desired position).
Parameter editing
Parameters for any given pad can only be edited in the browser. You can, however, jump directly to the correct scene and pad by <Alternate> clicking on the desired pad.
Performance
It is possible to access some of the performance options by using the mouse. The normal mouse click represents the trigger (Red Baton in the case of using the Radio Drum as controller). The two "shift" keys represent the two modifiers (the two pedals in the case of the Radio Drum) so that "left shift" clicking will normally stop the performance of the pad.
Pads in performance
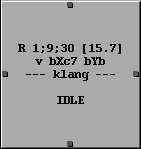
The virtual performance surface gives constant feedback to the performer on the status of all pads. A MIDI performance pad has the following representation:
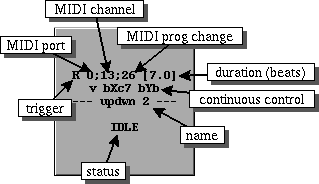
The first line shows:
- Trigger
- Which one is the START action trigger (in the case of the Radio Drum R stands for the red baton and B for the blue).
- MIDI Port
- Midi port: "0" is the first port, "1" is the second.
- MIDI Channel
- Midi channel: 1 through 15.
- MIDI Program Change Number
- Midi program change number that will be sent before the first performance of the pad.
- Duration
- Total duration in beats of the score. This does not take into account tempo variations due to the tempo envelope of to dynamic changes in tempo during the performance of the pad.
The second line is a mnemonic for the axes of continuous control. It is meant to give the performer some basic information so that he/she/it can figure out the basic behavior of the pad without having to edit it in the browser. Regretfully it is not so easy to decode... The first entry, if it exists, is a "v". If it exists it means that the trigger velocity is controlling the velocity of the notes. The rest of the entries describe all existing transfer functions (if active). Each entry is composed of:
- the letter "v" is the trigger velocity is controlling this transfer function.
- a baton color if a control axis is controlling the transfer function.
- an uppercase axis ("X", "Y" or "Z").
- a description of the MIDI message sent:
- "b" for Pitch Bend
- "p" for Channel Pressure
- "c" followed by a number for Continuous Controllers
In the previous example the trigger baton is the red baton, it controls the velocity of the note events and the blue baton is controlling Controller 7 in the X axis (normally volume) and Pitch Bend in the Y axis.
The third line is the name of the pad.
The fourth line is the current status of the pad.
The fifth line is optional and shows the number of beats till the performer stops performing.
When a START trigger is recognized the appearance of the pad will change in two ways. It will highlight and the status message will change: