Difference between revisions of "How To Get Satellite CCRMA"
From CCRMA Wiki
(→1. Get The Parts) |
(→2. Burn Image to the SD Card) |
||
| Line 28: | Line 28: | ||
* Realize that the block device for the entire (micro) SDHC card is named <tt>/dev/disk3</tt> | * Realize that the block device for the entire (micro) SDHC card is named <tt>/dev/disk3</tt> | ||
* Write the image to the entire (micro) SDHC card using the command | * Write the image to the entire (micro) SDHC card using the command | ||
| − | <tt>dd if=SatelliteCCRMA-xMRevC_Maverick.dd of=/dev/disk3 | + | <tt>dd if=SatelliteCCRMA-xMRevC_Maverick.dd of=/dev/disk3</tt> |
where you substitute the appropriate image name. This will take a while. | where you substitute the appropriate image name. This will take a while. | ||
| Line 35: | Line 35: | ||
Read the results in the terminal carefully to make sure that there weren't any errors. If you have any difficulties: try again, and/or try changing the <tt>bs</tt> value to 10M or something else. This changes the block size of each write. No matter what, using a high-quality (micro) SDHC card can save you a lot of trouble later! | Read the results in the terminal carefully to make sure that there weren't any errors. If you have any difficulties: try again, and/or try changing the <tt>bs</tt> value to 10M or something else. This changes the block size of each write. No matter what, using a high-quality (micro) SDHC card can save you a lot of trouble later! | ||
| − | |||
| − | |||
| − | |||
== 3. Put Them All Together == | == 3. Put Them All Together == | ||
Revision as of 11:33, 16 December 2011
by Edgar Berdahl, July 2011
1. Get The Parts
- 4GB SD/micro SDHC card - get a high-quality one from a brand like Kingston (Note: Don't try to use an 8GB card!)
- One GT Max adjustable-length USB cable
- Ethernet cable
- 2.5A 5V switching power adaptor
- Arduino Nano from Gravitec
- Solderless breadboard
- Only if you have the Beagle Board original: External Ethernet/USB hub such as the GWC Technology HE2440
2. Burn Image to the SD Card
Be very careful when carrying out this procedure! If you choose the wrong block device, you could easily erase everything on it!
- Download the appropriate Satellite CCRMA SDHC card image from the main page and uncompress it.
- Connect the blank (micro) SDHC card to your Mac by plugging it in directly to a camera SD card reader or use a USB micro SDHC reader/writer.
- Open up the Terminal program, and find out which block device the (micro) SDHC card is connected to by running the df command. For instance, you might see it show up as something like /dev/disk3s1. If yours is named differently, then just substitute the correct name throughout the remainder of the instructions.
- Unmount it by executing
diskutil unmountDisk /dev/disk3s1
- Realize that the block device for the entire (micro) SDHC card is named /dev/disk3
- Write the image to the entire (micro) SDHC card using the command
dd if=SatelliteCCRMA-xMRevC_Maverick.dd of=/dev/disk3
where you substitute the appropriate image name. This will take a while.
Read the results in the terminal carefully to make sure that there weren't any errors. If you have any difficulties: try again, and/or try changing the bs value to 10M or something else. This changes the block size of each write. No matter what, using a high-quality (micro) SDHC card can save you a lot of trouble later!
3. Put Them All Together
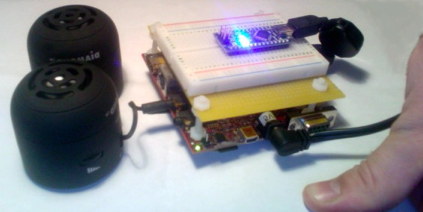
Plug everything in, and you should be ready to go. Here it is with some speakers.
