Difference between revisions of "CCRMA Comet How To Connect"
(Created page with 'How To Connect On this page, we explain how to connect to Satellite CCRMA over the Ethernet cable. [edit] Mac OS X If you are using Mac OS 10.6.3 through 10.8, you need to inst…') |
(→Windows 7) |
||
| (11 intermediate revisions by 2 users not shown) | |||
| Line 1: | Line 1: | ||
| − | How To Connect | + | == How To Connect == |
On this page, we explain how to connect to Satellite CCRMA over the Ethernet cable. | On this page, we explain how to connect to Satellite CCRMA over the Ethernet cable. | ||
| − | |||
| − | + | == Mac OS X == | |
| − | + | ||
| − | + | ||
| − | + | ||
| − | + | ||
| − | + | ||
| − | + | If you are using Mac OS 10.6.3 through 10.8, you need to install [http://www.macupdate.com/app/mac/26593/xquartz XQuartz] so that XWindows will work. (Prior versions (10.5+) have XWindows installed by default in the OS X Developer Tools, but if it is missing for you then first try downloading X11 from the same link.) | |
| − | + | <!-- If your laptop is currently connected to the Internet using some method other than Ethernet: It can be convenient to enable your kit to get onto the Internet. Go to ''System Preferences'' and choose ''Sharing''. Edit the settings so that your Internet connection is shared with the Ethernet port. In order to do this, you may have to disable ''Internet Sharing'' temporarily. Finally, click the ''Internet Sharing'' checkbox to enable this option. --> | |
| − | + | ||
| − | + | ||
| − | + | ||
| − | + | Now for your computer to be able to access your Raspberry Pi, install "Bonjour Browser" for Mac (download from [http://www.tildesoft.com tildesoft.com]) and open it. Now disconnect the Ethernet cable from your Mac. Go to System Preferences -> Sharing and click on the "Internet Sharing" submenu. For "To computers using," check Ethernet. Be sure to check the Internet Sharing box on the left. Last, reconnect the Ethernet cable -- now the steps below should work! | |
| − | [ | + | |
| − | + | You will use the Terminal program to login to Satellite CCRMA over the Ethernet connection. | |
| − | + | ||
| − | + | Now open up a window in Terminal. Your ccrma comet can be resolved via the hostname "satellite.local". To check that it is visible type the command ''ping satellite.local'', and see how fast the network response is. Once you are satisfied, hit Control-C to quit ''ping''. Then, to finally login to Satellite CCRMA, type | |
| − | + | ||
| − | + | ''ssh -XY ccrma@satellite.local'' | |
| − | + | ||
| − | + | The password should be ''temppwd''. | |
| + | |||
| + | In future you will not need to run bonjour browser to get things to work, but it is a good utility to use to see wether or not your device is connecting. Look under the "workgroup" subheading to see if satellite is available. | ||
| + | |||
| + | == Linux == | ||
| + | |||
| + | First install avahi-daemon to resolve ip via zeroconf. | ||
| + | |||
| + | * sudo apt-get install avahi-daemon (for debian distros | ||
| + | |||
| + | You can now connect from the terminal with ssh | ||
| + | |||
| + | * ssh -XY ccrma@satellite.local | ||
| + | <!-- For internet connection sharing, this link might help (I haven't tried it yet): https://help.ubuntu.com/community/Internet/ConnectionSharing --> | ||
| + | |||
| + | == Windows 7 == | ||
| + | |||
| + | * Download http://support.apple.com/downloads/DL999/en_US/BonjourPSSetup.exe to get bonjour support on Windows. | ||
| + | |||
| + | * Then Download [http://sourceforge.net/projects/xming/files/Xming/6.9.0.31/Xming-6-9-0-31-setup.exe/download XMING] and install it. Then start the Xming program from the Start Menu--it is in a folder called Xming. (I believe that it is not necessary to start the XLaunch program -- hopefully someone can confirm this during the next workshop.) | ||
| + | |||
| + | You will need to set up internet connection sharing, follow the instructions on the following page | ||
| + | |||
| + | http://www.dummies.com/how-to/content/how-to-share-an-internet-connection-in-windows-7.html | ||
| + | |||
| + | * Then download [http://www.chiark.greenend.org.uk/~sgtatham/putty/download.html Putty]. It will stay in your Downloads folder unless you put it somewhere else, such as the Desktop. | ||
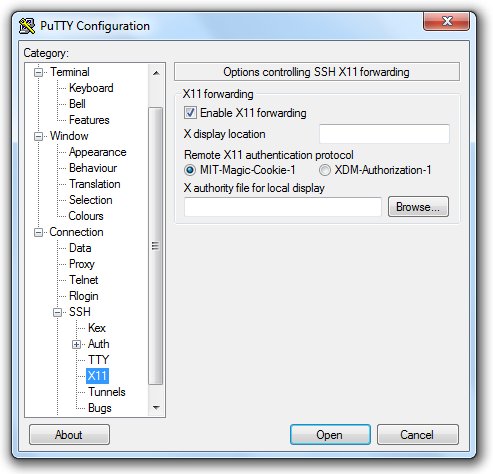
| + | ** Go to the ''Connection | SSH | X11'' panel and check "Enable X11 forwarding" <Br>[[Image:PuttyX11.png]] | ||
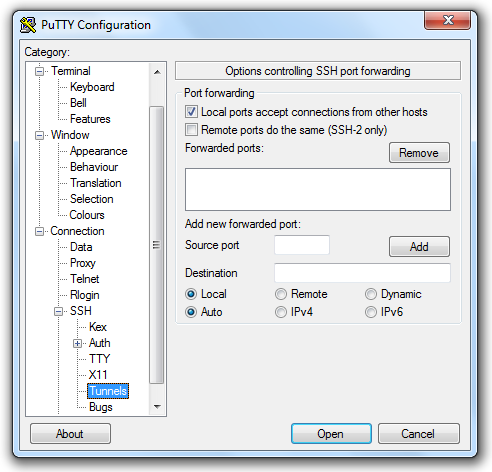
| + | ** Go to the ''Connection | SSH | Tunnels'' panel and check "Local ports accept connections from other hosts"<Br>[[Image:PuttyTunnels.png]] | ||
| + | ** Go to the ''Session'' panel and enter ccrma@satellite.local into the "Host name" field to specify that you want to log in to satellite.local using the user name ''ccrma''. | ||
| + | *** PLEASE NOTE IN THE BELOW IMAGES YOU WILL SEE A DEPRECATED IP, PLEASE PUT IN 'satellite.local' NOT '192.168.105.106' | ||
| + | <Br>[[Image:PuttySession.png]] | ||
| + | ** '''Select "Default Settings" and then click the "Save" button so that all these settings are saved by default.''' | ||
| + | ** Finally click on the "Open" button to open the connection. | ||
| + | ** The password is ''temppwd'' | ||
| + | ** Since a default pd patch started on boot, you can stop it by typing ''stop-default'' | ||
| + | ** Then run the command<Br>''pd &''<Br>to make sure that pd can successfully forward its Window to your laptop. | ||
| + | |||
| + | <center>[[250a 2009]]</center> | ||
| + | [[Category:Satellite CCRMA]][[Category:PID]][[Category:NMC 2011]] | ||
Latest revision as of 11:13, 4 October 2013
Contents
How To Connect
On this page, we explain how to connect to Satellite CCRMA over the Ethernet cable.
Mac OS X
If you are using Mac OS 10.6.3 through 10.8, you need to install XQuartz so that XWindows will work. (Prior versions (10.5+) have XWindows installed by default in the OS X Developer Tools, but if it is missing for you then first try downloading X11 from the same link.)
Now for your computer to be able to access your Raspberry Pi, install "Bonjour Browser" for Mac (download from tildesoft.com) and open it. Now disconnect the Ethernet cable from your Mac. Go to System Preferences -> Sharing and click on the "Internet Sharing" submenu. For "To computers using," check Ethernet. Be sure to check the Internet Sharing box on the left. Last, reconnect the Ethernet cable -- now the steps below should work!
You will use the Terminal program to login to Satellite CCRMA over the Ethernet connection.
Now open up a window in Terminal. Your ccrma comet can be resolved via the hostname "satellite.local". To check that it is visible type the command ping satellite.local, and see how fast the network response is. Once you are satisfied, hit Control-C to quit ping. Then, to finally login to Satellite CCRMA, type
ssh -XY ccrma@satellite.local
The password should be temppwd.
In future you will not need to run bonjour browser to get things to work, but it is a good utility to use to see wether or not your device is connecting. Look under the "workgroup" subheading to see if satellite is available.
Linux
First install avahi-daemon to resolve ip via zeroconf.
- sudo apt-get install avahi-daemon (for debian distros
You can now connect from the terminal with ssh
- ssh -XY ccrma@satellite.local
Windows 7
- Download http://support.apple.com/downloads/DL999/en_US/BonjourPSSetup.exe to get bonjour support on Windows.
- Then Download XMING and install it. Then start the Xming program from the Start Menu--it is in a folder called Xming. (I believe that it is not necessary to start the XLaunch program -- hopefully someone can confirm this during the next workshop.)
You will need to set up internet connection sharing, follow the instructions on the following page
http://www.dummies.com/how-to/content/how-to-share-an-internet-connection-in-windows-7.html
- Then download Putty. It will stay in your Downloads folder unless you put it somewhere else, such as the Desktop.
- Go to the Connection | SSH | X11 panel and check "Enable X11 forwarding"
- Go to the Connection | SSH | Tunnels panel and check "Local ports accept connections from other hosts"
- Go to the Session panel and enter ccrma@satellite.local into the "Host name" field to specify that you want to log in to satellite.local using the user name ccrma.
- PLEASE NOTE IN THE BELOW IMAGES YOU WILL SEE A DEPRECATED IP, PLEASE PUT IN 'satellite.local' NOT '192.168.105.106'
- Go to the Connection | SSH | X11 panel and check "Enable X11 forwarding"


- Select "Default Settings" and then click the "Save" button so that all these settings are saved by default.
- Finally click on the "Open" button to open the connection.
- The password is temppwd
- Since a default pd patch started on boot, you can stop it by typing stop-default
- Then run the command
pd &
to make sure that pd can successfully forward its Window to your laptop.