Difference between revisions of "250a Haptics Lab Force-stick"
(→Optional: Pluck-two-resonators~) |
(→Touch-a-wall) |
||
| Line 67: | Line 67: | ||
== Touch-a-wall == | == Touch-a-wall == | ||
* Start jack: <tt>qjackctl&</tt>, then press the start button | * Start jack: <tt>qjackctl&</tt>, then press the start button | ||
| + | * Plug in your speakers. Make sure they are powered on. | ||
* Open pd and load the patch <tt>~/250a/HSP/models/Touch-a-wall.pd</tt> | * Open pd and load the patch <tt>~/250a/HSP/models/Touch-a-wall.pd</tt> | ||
* Read the text of the patch so that you can understand how the layout of the patch relates to the equivalent mechanical system of the Force Stick being connected by a conditional link contact~ to ground. | * Read the text of the patch so that you can understand how the layout of the patch relates to the equivalent mechanical system of the Force Stick being connected by a conditional link contact~ to ground. | ||
Revision as of 16:46, 20 October 2010
Haptics Lab Using The Force-Stick for Music 250a
The goal of this lab is to introduce actuation and active force feedback. Each haptic effect can easily be coupled to a sound because the feedback loop is controlled directly in pd. Different haptic effects suggest different sounds; different sounds suggest different effects. What are the most interesting mappings? Which are appropriate, controllable, even "expressive". Try each sound control with and without haptic feedback enabled. Are there some that simply cannot be played without haptics?
Feel The Motors
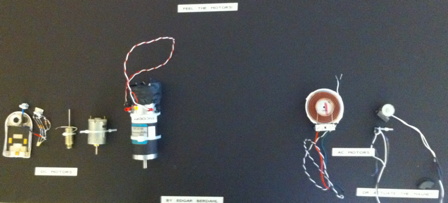
Find the foam-core board that has motors mounted on it and try them out.
For the DC motors, connect one alligator clip to the 6V supply on the Triple Output Power Supply from Hewlett Packard, and connect the other alligator clip to ground, which is labeled COM. Careful! Don't use the 18V supply instead--you could burn out the motors! By adjusting the +6V knob, you can change what voltage you are applying to each of the DC motors. Which way does the solenoid pull? What are small motors good for and what are large motors good for?
For the AC motors, use the Tektronix Function Generator. Try sine waves in the audible range 20Hz-20kHz on the white-colored AC motor. For it to be loud, it needs to be connected to something that can vibrate. Try changing the sound by coupling it to the foam core or the violin body or something else. The other, smaller AC motor can be used to vibrate objects with iron or steel in them or magnets. Try to use it to vibrate the magnet glued to the foam core. Try to use it to vibrate the violin string directly, which contains some steel inside it. (Hint: You will have to place it very closely to the string without touching the string.) Do you know at which frequencies the violin string responds the most?
Connect the DC Motor and Encoder to Your Kit
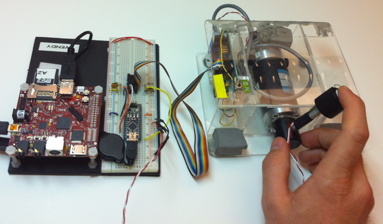
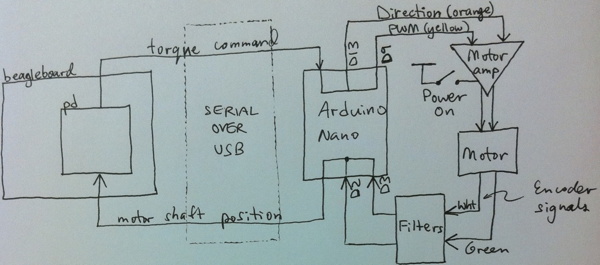
The image below shows the general configuration for the remainder of the lab. The Arduino Nano serves as a way to interface the beagleboard to the motor amplifier board and the rotary encoder on the back of the motor.
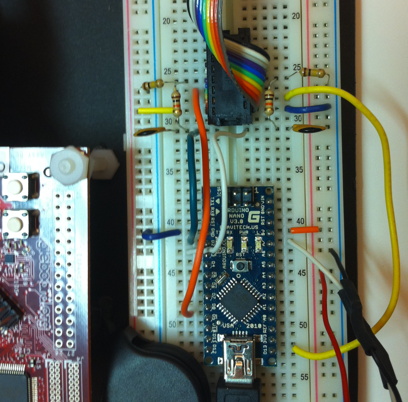
The multicolored 10-pin cable from the motor and encoder board ends in a DIP connector that fits into your breadboard. Plug it into your board so that it spans rows 22-30 as shown in the image below. First make the following basic connections:
- Short jumper from row 29 (left) to 5V (see yellow short jumper in image)
- Short jumper from row 29 (right) to ground (see blue short jumper in image)
- Long jumper from row 27 (left) to Arduino Nano pin D9 (see long orange jumper in image)
- Long jumper from row 28 (right) to Arduino Nano pin D13 (see long yellow jumper in image)
- Connect the red wire from the FSR to 5V
- Connect the black wire from the FSR to ground (0V)
- Connect the white wire from the FSR to analog input A7 of the Arduino Nano
Finally, make the final remaining connections to build the filter for the rotary encoder signals as shown below:
- For your own edification, you might wish to have a quick look at the datasheet for the DC motor with rotary encoder. This is what we will be using in the lab.
- Now you should be ready!
Setup the Force-Stick with CCRMA@Satellite
- First startup your kit
- Connect your ccrma@satellite kit to your laptop and boot it.
- Use a terminal window to login to ccrma@satellite as usual using the command ssh -X ccrma@192.168.1.105 with the password temppwd
- Check that your kit has access to the internet through you laptop. You can do this by trying to ping yahoo. Run the command ping yahoo.com. If it is successful, it will tell you how long it takes to send a packet from your ccrma@satellite kit to yahoo and back. If there is a problem, see the instructions in lab 3 for setting up the kit.
- Now copy the online lab files to your kit. At the command line in the terminal window, type wget http://ccrma.stanford.edu/courses/250a/labs/HSP.zip ~/250a to download the haptic signal processing toolbox file to your Beagleboard
- Unzip the file: change into the 250a folder, and type unzip HSP.zip.
- Run the command arduino& to start the Arduino software. (If it asks you if you want to install a newer version of the Arduino software, tell it no.) Use the Arduino software to open ~/250a/HSP/haptics_firmware/haptics_firmware.pde. Upload this code to the Arduino.
- Look at the main loop loop() in the source code for this firmware for a minute. You can see that it reads data from the serial connection from pd and uses this to set the direction of the motor and the PWM strength using analogWrite(). Then it writes data to the serial connection to pd about the position of the rotary encoder and the pressure applied to the FSR.
Touch-a-wall
- Start jack: qjackctl&, then press the start button
- Plug in your speakers. Make sure they are powered on.
- Open pd and load the patch ~/250a/HSP/models/Touch-a-wall.pd
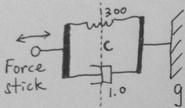
- Read the text of the patch so that you can understand how the layout of the patch relates to the equivalent mechanical system of the Force Stick being connected by a conditional link contact~ to ground.
- Turn on audio by clicking on compute audio. This is necessary because HSP uses audio signals to calculate the haptic force feedback. This makes it far easier to build patches because then you do not have to worry about using the trigger object.
- Verify that by moving the Force Stick back and forth, you can make the hslider shown in the patch change.
- Hint: Remember that rotary encoders don't necessary know where 0 is--they just choose zero as being the position when the program first starts.
- To zero the rotary encoder for the force stick being held in the middle, first rotate the force stick to the center, and then press the reset RST button on the Arduino.
- Now hold the force stick in one hand, while you turn the power on for the motor amplifier board by switching the toggle switch to the ON position.
- You should be able to feel a spongy "wall" when you move the force stick to the right of the center position. (If not, then check your setup.)
- Because of the spring action of the contact~ link c, the force increases when you move to the right. However, if you move far enough to the right, then the motors can no longer increase the force level any further due to mechanical limitations.
- Try decreasing the stiffness of the contact~ link to 150 N/m. How does this feel?
- Consider a hypothetical situation involving two springs with stiffness k N/m. If you connect the two springs in series, is the net stiffness 2k or 0.5k? What if you connect the two springs in parallel?
- When you are done with the patch, turn the motor amplifier board off again. (The motors get quite hot if left on for long periods of time.)
Note: Systems with feedback can become unstable if the right conditions arise. This is why it is a good idea to turn off the motor amplifier board when you are not using the system. (Otherwise, consider what can happen with a public address system if you leave it alone and it starts to squeal/howl.)
Wiggle-a-mass
- Close any other open patches, and then open ~/250a/labs/HSP/Wiggle-a-mass.pd
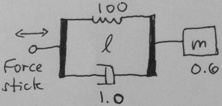
- Read the patch and notice how the layout of the patch matches the equivalent mechanical system of a Force Stick connected by a springy link~ to a virtual mass.
- On the left, the position of the Force Stick is shown with an hslider, and on the right the position of the virtual mass m is shown with an hslider.
- Turn on the motors and wiggle the Force Stick back and forth. Can you feel the virtual mass?
- What happens if you change the virtual mass from 0.6kg to 0.3kg?
- What happens if you change the damping in the link~ from 1 N/(m/s) to 0 N/(m/s)?
- Is it a bad idea to make the damping negative?
Optional: Pluck-two-resonators~
- Open this patch and see if you can guess what will happen. Now try it!
- Read the patch and notice how the layout of the patch matches the equivalent mechanical system.
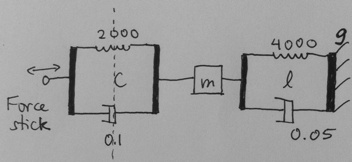
- For example, note how one virtual resonator is formed by mass~ m connected to ground g by link l. The second resonator is formed by mass~ m2 connected to ground g2 by link l2.
- In case you are wondering about the equivalent mechanical system, here is a similar one: the force stick is plucking a single virtual resonator.
- Why does the pitch increase when you can feel the virtual resonators? Hint: contact-pluck~ c behaves like a spring when the Force-stick is connected to the resonators. Another hint: Consider whether c is connected in parallel or in series with the virtual resonators.
Pluck-a-string~
- First try interacting with the string without any haptic force feedback. Then turn on the power to the motor amplifier board and try to pluck the string. Is it easier to play with or without haptic feedback?
- Clicking on the bang in the main patch will cause an impulse to be send into the string. What do you have to do with the Force Stick in order to be able to feel the impulse?
- Open up the subpatch to have a look inside.
- Try to imagine what it would look like if the delread~ and delwrite~ pairs were bypassed? Again, the layout of the patch should provide some indication for the equivalent mechanical model
- Optional: How could you change either of the DWG-end~ objects to increase the fundamental frequency of the string's sound?
- If you would like to learn more about physical modeling then take Julius Smith's course Music 420 in the winter quarter. For some specific information about this particular physical modeling method, see this brief tutorial.
- Remember to turn off the power to the motor amplifier board when you are finished.
Human-robot-interaction~
- Open the patch and notice the shaker sounds when you move the Force Stick back and forth.
- Open up the pd Shakers~-abstraction to see the sound synthesis module.
- Try changing some of the parameters to see how it changes the sound.
- In particular, try choosing different gain sounds by clicking in the different boxes set in a row at the bottom of the patch. Which is your favorite?
- Now hold onto the Force Stick while you turn on the motor amplifier board with the other hand. (Be careful because this patch is especially likely to become unstable! If the Force Stick should become unstable, turn off the motor amplifier board again.)
- You should now feel a virtual "robot" that tends to shake the Force stick about 5 times per second.
- Look at the mechanical analog inside pd subpatch-blocked-at-1. Again the Force Stick is connected by a link to ground. However, this time the position of ground g is modulated by osc~ 5 and neighboring objects.
- There is an FSR mounted on the end of the Force Stick. We have not used it yet! To change this, click on the toggle in the main patch window. Now the pressure that you apply to the FSR should change the spring stiffness for link l1. That is to say, if you do not apply any pressure, then the spring stiffness is zero, so there is no force feedback. However, as you apply increased pressure, the spring stiffness becomes stronger, providing for stronger force feedback.
- Note that in the previous patch, the same physical model was used to synthesize both the audio feedback and the haptic force feedback, in this case, the output from the haptic feedback model is used to control the shaker~.
Build Your Own
Make your very own musical controller using the Force Stick and one of the above patches as a starting point. Here are some ideas, but feel free to follow your own interests:
- Make a record scratching interface allowing you to feel the record.
- Or try to impart kinetic energy from your body into a physical model of an instrument.
- Or can you program the haptic interface so that it allows you to feel a texture? Use the FSR to control the strength of the texture. (This is a haptic illusion--it seems like there are multiple axes that are actuated, but really there is only one actuator.) See this paper by Bill Verplank.
- Or use the same physical model to calculate both the haptic force feedback and the audio feedback. For instance, you could create multiple virtual objects that you can pluck by giving them different mechanical ground positions.
- Or if you would like to try some advanced three-dimensional force feedback using the NovInt Falcon, you can use the same physical modeling formalism with HSP for Max/MSP.
Make us proud. And be ready show off your controller at the next lab session!
