Lab 6 HAPTICS
The goal of this lab is to introduce some simple one-dimensional active
force-feedback using a motor and encoder. We start either with a
small
knob or with a stick that has a force sensor on the top; other devices
could be attached to the motor shaft. Each haptic effect can be
coupled to
a
sound by sending OSC to Pd. Different haptic effects suggest
different
sounds; different sounds suggest different effects. What are the
most interesting mappings? Which are appropriate, controllable,
even "expressive". Try each sound control with and without the
motor turned on. Are there some that simply cannot be played
without haptics?
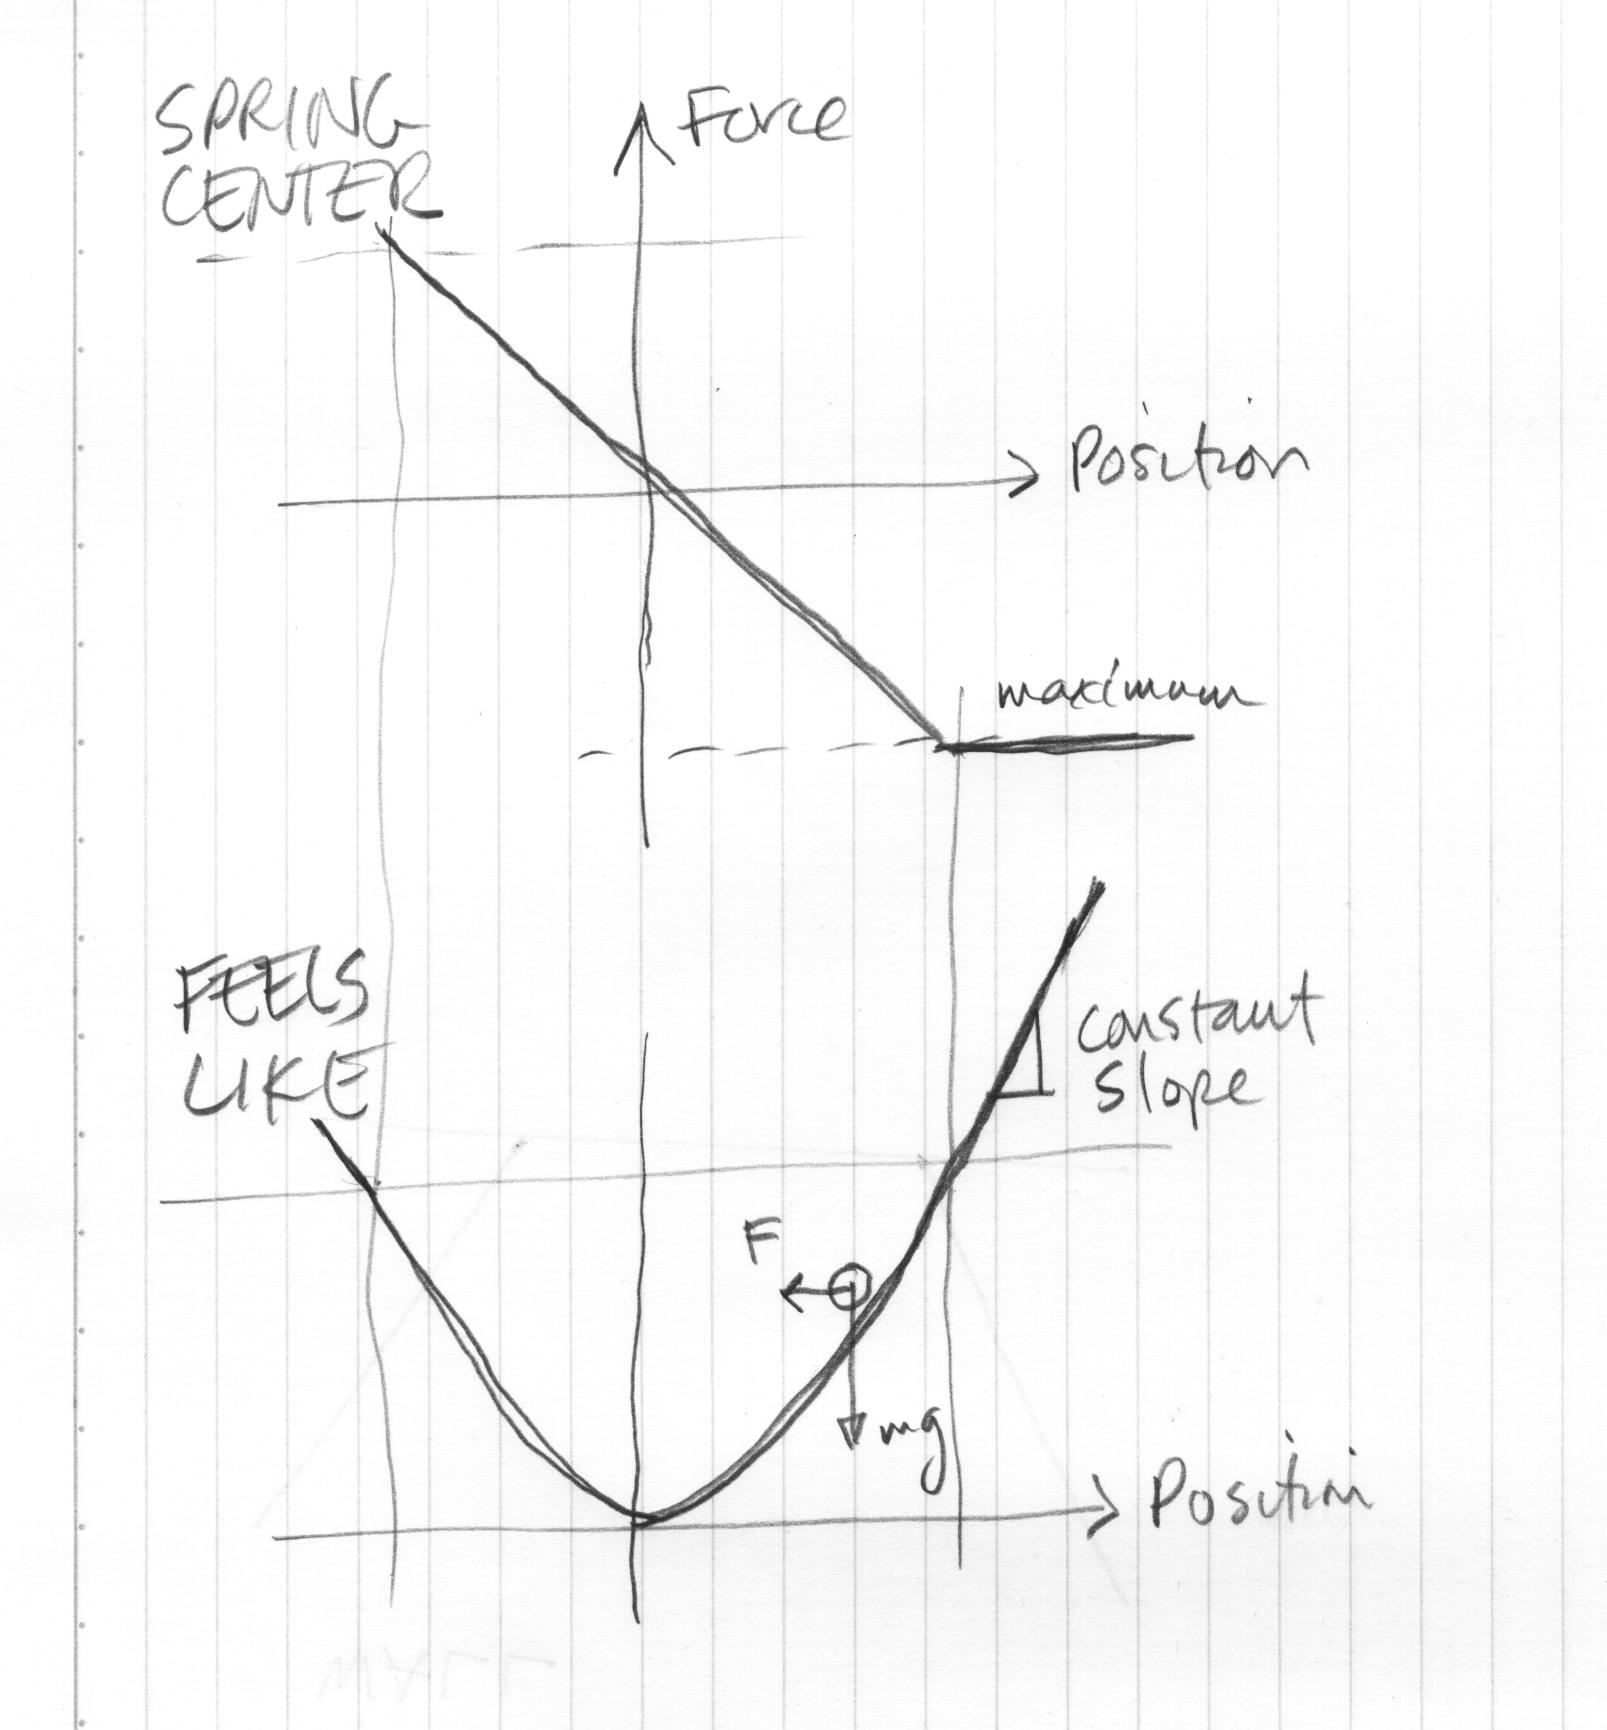
PROFILES - First we compute forces as a function of just position: for
every encoder position, there is a specific force. Think of it as
a profile or landscape -- a resisting force feels like pushing
something up a slope, as the force increases,
the slope increases. Think of the
spring-centering of motortest.c as a "valley", wall.c has no force
until you reach the wall, bumps.c and detents.c are all variations of
force as "slope". Textures can be rendered as series of
bumps. Stability: A
very stiff wall is hard to make "stable": first, the
encoder and force values are discrete making for "stair steps" or
"zippers" and the calculations in fixed-point reducing resolution, more
importantly the update rate must be high. You can explore various
resolutions and rates.
TIME - Forces that vary in time can be pre-programmed (tick.c). A
short positive then negative force, if it is quick enough feels like a
click. When pressing against a spring, a click simulates a
contact being made.
DYNAMICS - We can increase the apparent "mass" - giving the knob a
twist, gets it going. You can simulate simple mass-spring
oscilators (think of it as a pendulum). Without measuring force
(we only measure position) we cannot reduce the "mass" or
"damping". The human hand acts as a "damper" stabilizing an
oterwise oscillating system; the hand can also be a spring-mass coupled
with the virtual spring-mass just like a drum stick bouncing on a snare.
FRICTION - can be simulated with a combination of texture, dynamics and
even pre-programmed
0. Set up
a. connect the ribbon cable from PORTX on the
motor board to PORTD on the AVR. Check the orientation: make sure that
both headers have pins 9-10 at the same side of the ribbon cable (e.g.
BLACK)
b. wire the motor's encoder (grey cable) to
AVR/Protoboard: White to D2, Green to D3, Red to +5v and Black to GND.
D2 and D3 are the two external interrupts and represent Phase A and
Phase B from the encoder.
c. connect the power for the motor directly to the
15v supply pins, Yellow on the left pin and Black on the center pin of
the two that have been attached to U5. This is the same place that we
picked up 15v for the OpAmps in Lab 4.
d. plug in the Spyglass LCD to PORTC.
e. for the stick, connect the FSR Red to +5v, Black
to GND, White to A0 for a2d conversion.
g. load Lab6 on to your 250a directory
download: these program files files and unpack them in your lab 6 directory using tar -xvf
h. add these files to your ~/avrlib/ccrma directory.
cp -r /usr/ccrma/web/html/courses/250a/labs/lab6/avrlib_ccrma_lab6.tar ~/avrlib/ccrma
cd ~/avrlib/ccrma
tar -xvf avrlib_ccrma_lab6.tar
1. motorspy (spring-centering)
a. run "motorspy.c"
~>cd ~/250a/lab6/programs/motorspy
~>make
load
b. The LCD should display
Encoder: Force: and Duty:
i) Try moving the knob/stick left
and
right.
ii) What is the maximum duty?
iii) If you press on the FSR the
forces will increase.
b. Try 'motortest.c' It is the same program but with
out the
Spyglass
display.
c. Try 'motorosc.c' It is the same program but with
out
the Spyglass
display and with OSC. After loading motorosc.c, start motorosc.pd.
2. wall
a. run "wall.c"
~>cd ~/250a/lab6/programs/wall
~>make
load
b. Look at the code for wall.c.
i) Make the wall "stiffer"; what
if it's too stiff?
ii) Make the walls further appart or
closer together.
3. bell (one wall, sending to Pd)
a. run "bell.c"
~>cd ~/250a/lab6/programs/bell
~/250a/lab6/programs/bell>make
load
b. run "wallbang.pd"
~/250a/lab6/programs/bell>pd bell.pd
c. when you "hit" the wall, a sound should be
triggered.
i) Change the sound file in the
Pd patch by loading "snare" or "kick".
ii) By varying the wall stiffness (SW7
or SW7) can
you get an intentional bounce?
iii)
What stiffness (k) best matches the sound chosen?
iv) With the right stiffness, you should
be able to get a "drum roll".
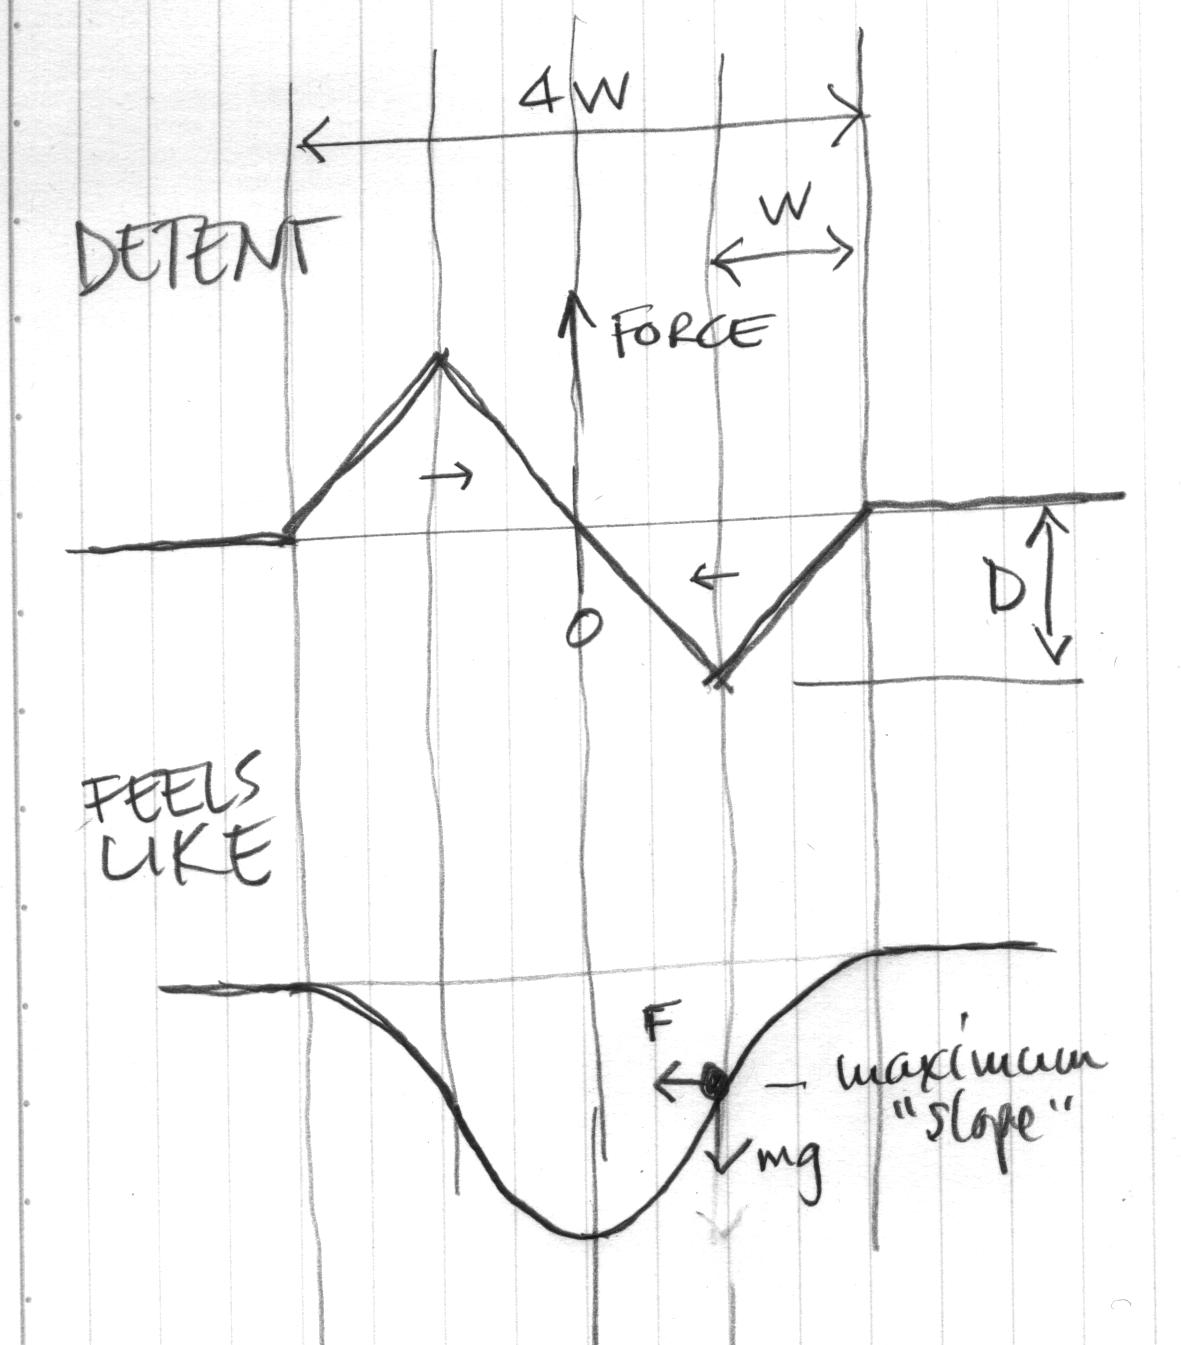
4. bumps and detents, plucks and friction.
A "bump" is a slope up to a round
top
and a
slope down on the other side.
A "pluck" is a slope up like a wall but followed by
an abrupt drop in force at the top.
Stick-slip "friction" is many small plucks in a row.
a. run "detent", "detents" and "pluck".
b. can you make a "bump" instead of a "detent"?
c. think of sending some OSC messages at the right
time/positions.
d. vary W, D, S to match the sounds from Pd.
5. tick - timed forces
a. run "tick.c"
~>cd
~/250a/lab6/programs/tick
~/250a/lab6/programs/tick>make
load
b. Look at the code for tick.c
i) Make the ticks longer, larger,
more frequent.
6. walltick - "tick" on wall "entry"
a. run "walltick.c"
~>cd
~/250a/lab6/programs/walltick
~/250a/lab6/walltick>make
load
b. run "snare.pd"
~/250a/lab6/wallbang>pd Snare.pd
c. what is the "right" place (distance
into the
wall), magnitude, etc.
d. try matching the wall stiffness and the tick to
different sounds.
7. pendulum
8. spring, mass and damping
references:
<~/avrlib/ccrma/osc.h>
<~/avrlib/ccrma/osc.c>
not included in <~/avrlib/docs/>
see schematics and manual for MotorBoard on Pascal's site: AVR boards
motor data sheet: <~/Lab6/RelianceMotor.jpg>