Openmixer
OpenMixer is a multichannel routing and mixing program written almost exclusively in SuperCollider that runs on a dedicated Linux workstation (running Planet CCRMA) and was conceived to control audio routing and mixing in the Listening Room, a 3D studio at CCRMA.See the manual below for a description of its interfase.
Openmixer Manual
The OpenMixer hardware and software in the Listening Room is controlled through two USB controllers connected to the OpenMixer computer. Here is a description of the overall controls: The controller on the left controls the input source selection, level setting of each input channel and input level metering for each channel. The controller on the right controls the routing of each selected input channel to each one of the possible 24 output channels, the Ambisonics decoder mode and sampling rate selection. Each input source in OpenMixer can independently function in one of two main modes of operation. An input source set to the "Normal" mode will be able to route (with gain control) each input channel of each input source to one or more speakers. An input source that is set to the "Ambisonics Decoder" mode is assumed to be already encoded in Ambisonics and is automatically routed to Ambisonics decoders that are properly calibrated for the Listening Room speaker setup. More than one input source can be routed at the same time to the outputs, independently of other input sources, and different sources can be in Normal or Ambisonics Decoder mode at the same time. See the next sections for detailed instructions on how to use each one of the modes. |
Normal Mode
In Normal Mode OpenMixer behaves as a routing matrix with gain. Any input channel from any input source can be routed to any speaker. Follow the instructions below to route audio in Normal Mode (in short: select a source [1], select input levels [2], define routing to all speakers [3] and optionally control the overall level for all input channels [4]. Select the input source1. Press any of the source buttons to select an input source, the button will light up and that source will be selected.Set levels for the input channels2. Move a fader to control the level of an input channel. For sources that have more than 8 channels, press the appropriate layer button to select channels 1 thorugh 8, 9 thorugh 16 or 17 through 24 (NOTE: sources can have 8, 16 or 24 input channels, only the layer buttons that make sense for a given source will work).SHORTCUT: press one of the three PRESET buttons to automatically select -10dB, -5dB or 0dB input levels for all input channels, -10dB level for the master level control of the source and default (reasonable) routings to all speakers. This will take care of [2] and [3] for most situations. Route input channels to the speakers3: First select an input channel. Moving a fader will select that particular channel automatically and the channel select button will light up. Pressing the channel select button will select a channel without changing the input level.With one input channel selected define the level to be sent to each speaker using the speaker volume knobs in the control surface on the right.Here is the mapping of controls to speakers in the Listening Room: |

Ambisonics Mode
In Ambisonics mode OpenMixer can decode an incoming Ambisonics encoded audio stream. Select the input source1. Press any of the source buttons to select an input source, the button will light up and that source will be selected.Activate Ambisonics mode2. Press the Ambisonics button to enable the Ambisonics decoding mode.Set input level3. In Ambisonics mode only the first fader is active. Move the fader to set the input level for all channels in the selected source. If you move any other fader it will automatically reset to 0 after a couple of seconds.Select the Ambisonics Decoder4. OpenMixer has several decoders. Press the Ambisonics decoder button for the decoder you want to be active. Current choices include:
Master level5. This control is redundant but can be used to set the master level of the input source. Press the knob to reset the level to -10dB.Select channel order and weights6. Ambisonics streams can use different encodings and component weights, select the one that matches the encoder you are using. The default is FUMA order and weights (channel order is W X Y Z R S T U V K L M N O P Q for a full periphonic 3rd order signal), but you can also select ACN/SN3D (channel order is W Y Z X V T R S U Q O M K L N P for a full periphonic 3rd order signal). There is also an "ORIG" selection for FUMA ordering but non-standard component order (this is for backwards compatibility with old sessions, component order is W X Y U V P Q Z R S T K L M N O).If you work on Ardour with the standard 3,3 Ambisonics panner you should select FUMA standard order and weights and connect the master 16 channel bus 1 to 1 to the first 16 system:hardware Jack ports. Input Channel OrderingThe ordering of the channels for the inputs is as follows:
See this page for the meaning and equations that correspond to each component of an Ambisonics stream. For the "ORIG" order the first 8 channels can contain a mixed order stream (3rd order horizontal and 1st order vertical), the next 8 channels add full periphonic 3rd order components. |
Input Sources
Linux ComputerThe linux workstation in the Listening Room is connected to OpenMixer through ADAT digital connections (24 channels)See Using Jack on Linux for detailed instructions on how to set up the soundcard and Jack audio server in the workstation. Analog InputsThere are 16 analog inputs accessible through the equipment rack patchbay (16 1/4" balanced inputs)Microphone Amplifier InputsThere are 8 analog input channels accessible through the equipment rack patchbacy (8 XLR balanced inputs)ADAT inputs2 8 channel ADAT lightpipes are accessible through the equipment rack patchbayNetjackThe equipment rack patchbay includes 4 RJ45 gigabit ethernet connectors. With the appropriate software installed (the jack1 version of netjack), a computer can be connected to each one of them and automatically be able to stream 24 digital full resolution channels to and from the OpenMixer system.See Using Netjack for detailed instructions on how to use netjack on Mac and Linux computers. JacktripJacktrip can also be used to stream a multichannel full resolution stream to and from the OpenMixer computer (Jacktrip support is currently disabled).Media PlayerThe equipment rack includes a DVD player that has its analog multichannel outputs connected to this source. |
Monitoring
| OpenMixer can send any of the input sources to the Linux workstation and all four instances of netjack connected computers. To enable monitoring for a given source press the [MONITOR] button. Each input channel for the selected source will be sent to each corresponding channel of the Linux workstation and netjack computers (up to a maximum of 24 channels). The monitoring level will be defined by the input channel faders and master level control. To send a pre-fader signal press the [pre-fader] button (the monitor button has to be ON for this to have any effect). This is particularly useful for using the microphone preamplifier that is in the equipment rack. WARNING: be careful with your Jack routings, it would be easy to set up a feedback loop! Remember the location of the [MUTE] button. |
Sampling Rate
| The sampling rate of OpenMixer can be set to 44100Hz or 48000Hz by pressing the appropriate button (see the overview for their location). Changing the sampling rate is a long process as it involves restarting almost all the programs that make up OpenMixer. Its progress will be highlighted by LEDs in the control surfaces lighting up in sequence. Changing the sampling rate of the main converter box will make all speakers click a little bit (but with low enough volume to not be of concen). |
Using Netjack
| Netjack enables computers or laptops to connect to OpenMixer easily with just one ethernet cable. A computer or laptop using the proper version of Netjack will see 24 input and output channels through Jack. |
Netjack under Linux
Using Netjack under LinuxTo connect your Linux laptop to OpenMixer you will need an up to date version of Jack2 compiled with the "netone" netjack driver (see http://www.jackaudio.org/download - 1.9.6 at the time of this writing). You also want to have a current version of Qjackctl (http://qjackctl.sourceforge.net/ - 0.3.6 at the time of this writing) that supports "netone" out of the box.If you have installed Fedora and the Planet CCRMA audio package repository then you should have both (otherwise run "yum install qjackctl jack-audio-connection-kit" from the command line and - if you have the Planet CCRMA repository enabled - you should get the right versions for both). Commands to install them in other distributions would be different (for example, use apt-get in Ubuntu). The following pictures and the description of the procedure was done on a laptop running Fedora 13, other versions of Fedora or other distributions may have slightly different looks for the applications. Connecting your computer to OpenMixerMake sure that you have configured your laptop to use DHCP so it automatically gets an IP address from the OpenMixer computer. Connect your laptop to one of the four ethernet ports in the Listening Room equipment rack (use one of the yellow ethernet cables). Once you are connected you should be able to access the Internet (fire up a browser and test the connection - and make sure you are not connected through wireless only!).Starting JackStart Qjackctl (from the "Applications", "Sound & Video" menu):
Click on "Setup", change the Driver to "netone" and click "OK":
For netjack to work you need to enable incoming UDP packets on port 3000 in your firewall, so fire up your firewall configuration utility. In Fedora 13 that would be in the "System" -> "Administration" -> "Firewall" menu entry.
This is how the main window of the firewall configuration utility will look after you add the port:
Press "Apply" and firewall should be restarted including your new access rule.
followed immediately by:
If this last part does not appear you are either not connected properly to the OpenMixer ethernet port or your firewall configuration is incorrect.
At this point you can start Jack applications and connect them to the OpenMixer netjack source through Jack. |


Netjack under OSX
Download and install JackOSXDownload and install the version of JackOSX that corresponds to the version of OSX you are running.The most up to date versions are in the JackOSX web site itself. Go to the download page and select the installer that corresponds to your OSX version. You could also go to the Jack Audio Connection Kit download page, and download from there, but versions might be older than the ones in JackOSX.com. Open the downloaded file with the archive utility. It will unpack the download and show you the installer package. Double click on it and install the package. This will add to your computer:
Download and install QjackctlFirst check to see if Qjackctl was already installed, as it is part of the newer versions of JackOSX, if so please skip this step...Qjackctl is a very convenient Jack GUI front end that is the default interface for Jack in Linux. There are binaries in the Ardour web site but not of the latest version (go to http://www.ardour.org). You can download a current version with "netone" driver support from here:
Open the dmg file and drop the Qjackctl application bundle into your Applications folder. Connecting your computer to OpenMixerMake sure that you have configured your laptop to use DHCP so it automatically gets an IP address from the OpenMixer computer. Connect your laptop to one of the four ethernet ports in the Listening Room equipment rack (use one of the yellow ethernet cables). Once you are connected you should be able to access the Internet (fire up a browser and test the connection - and make sure you are not connected through wireless only!).Running Jack through QjackctlQjackctl is a GUI front end for Jack. After starting it you should see its main window:
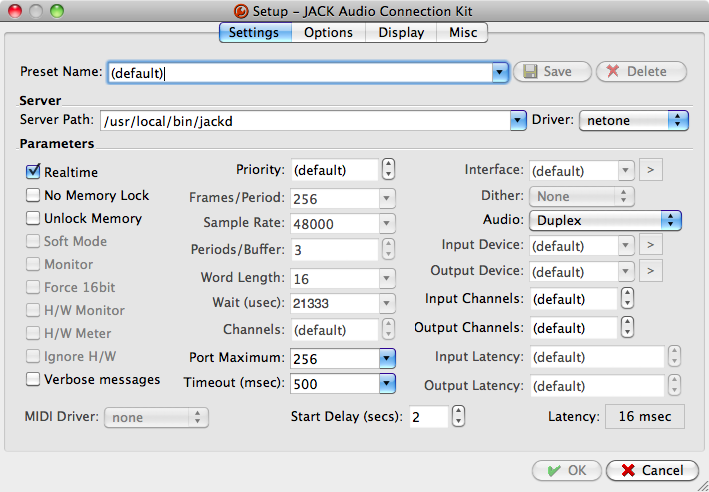
You will need to configure it before starting Jack! Click on the "Setup" button and change:
Close the "Setup" dialog and click on "Start". If your firewall is running (and this is the first time you run Jack with the "netone" driver) you will be prompted to allow incoming connections from jackdmp:
Click on "Allow" and Jackd will finish starting up since it can now connect to the Netjack server running on the OpenMixer computer. If you click on "Messages" you will see that Jack is now running with a period size of 256 frames and it has 24 input and output channels (and 1 MIDI channel as well), which matches the default configuration of the OpenMixer Netjack servers. Click on the "Connect" button to show the connections window:
You can click on each client to show individual channels and you can drag connections from the left pane to the right pane. Very easy. But before you start to connect applications together you have to let your Mac know that it should send Core Audio audio to Jack itself... Setting the number of channels JackRouter will haveStart JackPilot (in the "Applications" "Jack" folder) and open the Preferences panel.
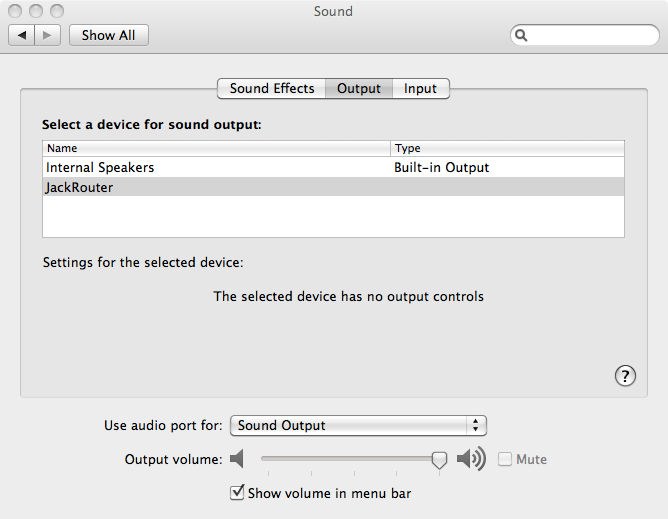
Set the number of channels that Core Audio will see in the "Virtual Input Channels" and "Virtual Output Channels" fields. You will need to modify this if you want to use Core Audio apps with multichannel outputs (more than the default of stereo). You should set "VIrtual Input Channels" and "Virtual Output Channels" to 24. Routing Core Audio to JackNow go to your "System Preferences" and then "Sound" and you will see an entry for "JackRouter" in both the input and output tabs.
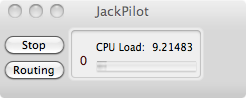
Click on "JackRouter" to send audio from Core Audio OSX programs to Jack. You can do the same for the "Input" tab. Start an OSX program and you should get audio from it through the Netjack connection. Of course you will need to have selected the "netjack" source in OpenMixer and set a default preset for a default routing in OpenMixer to hear sound. Running Jack through JackPilot (optional)JackPilot is included in JackOSX and is a GUI front-end to Jack. NOTE: you can't start Jack with the "netone" driver from JackPilot as it does not yet include support in its GUI for it (use Qjackctl instead or start jackd from a terminal).If you start it with Jack already running you will see its main window. You will see how much CPU Jack is currently using:
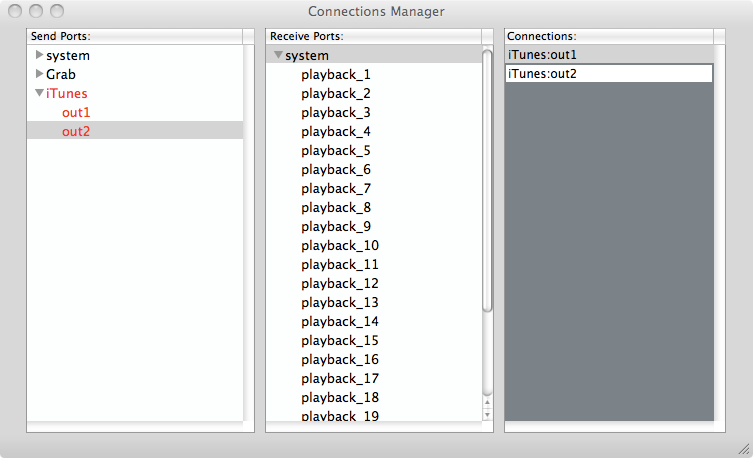
Click on "Routing" and you should see "system" ports for input (Receive) and output (Send) in the "Connections Manager" dialog:
Click on the port to open it up and show the individual channels. Both "system" ports should have 24 channels. In the Jack world "system" ports normally point to your soundcard, in this case they are input / output connections to OpenMixer. Route your channels in the "Routing / Connections Manager" window by clicking on the "Send Port" that corresponds to the application that is generating audio, and then on one of the channels. The select the "system" "Receive Port" and double click on the channel that you want to connect to. You can route any channel from any application to any output channel in the Listening Room. This picture shows a simple stereo connection to the first two channels from Itunes:
|


Using Jacktrip
Jacktrip is currently disabled in OpenMixer. Stay tuned...Using Jack on Linux
The Linux workstation in the Listening Room is connected to the OpenMixer system through 24 channels of digital audio. This page details the configuration you have to do to make sound work correctly. Set up the sound card mixerThe audio interface in the Linux workstation (an RME Digiface) has to be properly configured. First start the "hdspconf" utility (in the "Applications" "Sound & Video" menu) and make sure that the card is set to be a slave to the OpenMixer system by clicking on "Autosync":
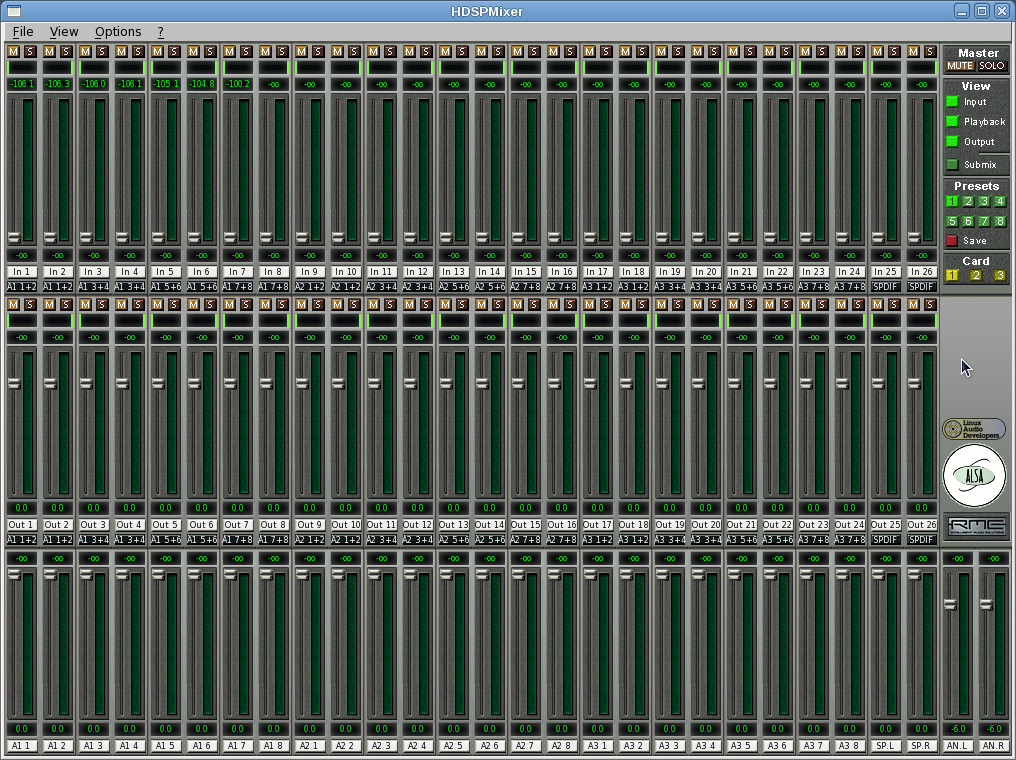
You can only use the current sampling rate of the OpenMixer system. Then start the "hdspmixer" utility (in the "Applications" "Sound & Video" menu) to initialize the mixer in the sound card:
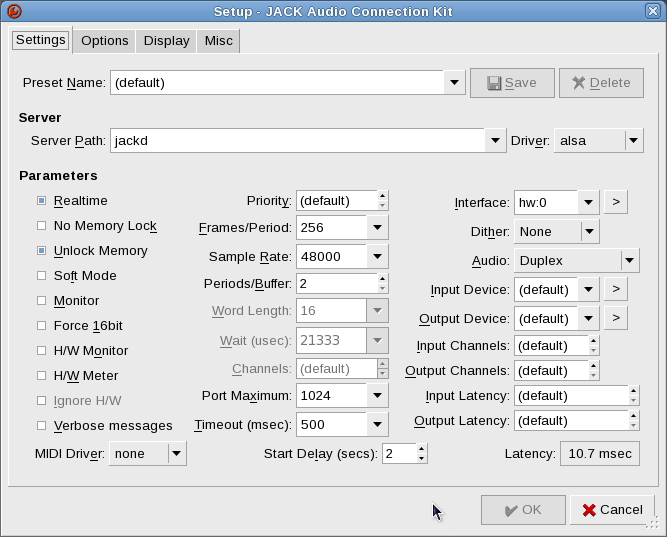
This will ensure that the mixer is properly routing audio. You only need to do this once since the last reboot of the workstation but since you don't normally know when that happened it is best to always start hdspmixer after you login (you can close it at any time after it has started). Hdspmixer can also help you debug you application as it will show in its meters any audio activity in any channel. Both hdspmixer and hdspconf can be found in the "Applications" "Sound & Video" menu, and they can be dragged from there to your upper panel so that they are easy to access in the future. Set up JackStart qjackctl (the graphical GUI for the jack sound server). Qjackctl can be found in the "Applications" "Planet CCRMA" "Jack" menu and can be dragged from there to your upper panel so it is easy to access in the future. Press the "Setup" button and make sure that:
You can set the overall latency of the Jack sound server by changing the "Frames/Period" to a lower value (the default is 1024 frames per period). If you are doing realtime control and audio rendering a good lower bound is 128 frames per period which gives an overall latency of 5.33 msec at 48000Hz sampling rate. Click "Ok" to save your changes. You only need to do this the first time you use Jack. These settings should work on all CCRMA workstations. Start JackPress "Start" in qjackctl and Jack should start with no problems. If there are problems press "Messages", there is usually a clue to what is wrong in the messages that jack prints while it tries to start (for example double check that the sampling rate is the same as that of the OpenMixer system).
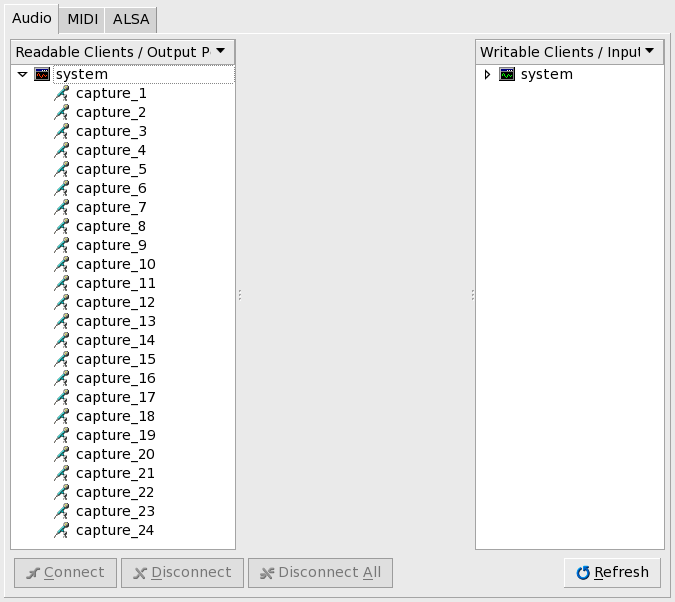
Once Jack is up and running press the "Connect" button to look at the Jack clients and all their input and output channels. If no other Jack program is running you should only see a "system" client in both panes, that is the soundcard and should show 26 channels on each pane (24 channels are directly connected to OpenMixer, the other 2 are an SP/DIF interface that is not routed anywhere).
This is the interface you can use to graphically connect clients between them and to/from the soundcard. Some Jack clients autoconnect their ports, some don't. Always check the connections if you are not getting sound from your application. Getting the best performance from the workstationTo get the best performance from the workstation you should switch the CPU to always run at the highest speed when you are doing audio work (this is optional but recommended specially if you are running at low latency settings).First add the "CPU Frequency Scaling Monitor" applet to your upper panel. Right click in any free space in the panel and select "Add to Panel". In the dialog select the applet (as shown below), press "Add" and then "Close" the window.
Once you have the applet click on it and select "Performance". That will fix the speed of the CPU to the highest possible setting.
You are all set! |